Change font size
It is currently Thu Apr 18, 2024 3:25 pm


Post a new topicPost a reply Page 24 of 28   [ 407 posts ]
Go to page Previous  1 ... 21, 22, 23, 24, 25, 26, 27, 28  Next
Author Message
 Post subject: Re: 242 Build Thread.
PostPosted: Sun Dec 01, 2013 7:25 pm 
Haha, I just built a W24 Octo-Turbo, now what?!
User avatar

Joined: Wed Jun 14, 2006 4:19 pm
Posts: 3131
Location: Lethbridge, AB
Update time…I spent a great day on Saturday with Dale and Matt playing machinist. I had a few parts to build for another engine project and I also had a few holes to drill.

Here's the progress.

Silicone seal upgrade for B20's.

Just a little trim and it's ready for a modern seal.

Image

Four boxes of parts dropped off for Top Gun to make pretty.

Image

Added a temp sensor bung to the oil pan.

Image

Exhaust flange cleaned up by hand.

Image

In order to run LH 2.4, you have to drill a 60 - 2 pattern on the edge of the flywheel or deal with the monster "dog dish" wheel. My dogs have dishes, so a flat flywheel was modified to work. Just for the record, the pattern is 6 degrees per hole and 58 holes are drilled 2 are not drilled. Don't chamfer the tops of the holes, but do pass a file over them to clean off the burr. Also NB the gap is NOT SYMMETRICAL about the flywheel bolt circle. It's offset - so you can't drill the pattern just using the flex plate as a guide as has been indicated on forums like TBrix.

Now, it's all easier to do if you have access to a rotary table.

Dale's dialing in the 6 degrees of separation.

Image

This is only 1/2 way done…so many holes to drill.

Image

Back home for a clean up and a test fit.

Image

I had to nip 1/8" off the mount to put the sensor over the holes (and the flywheel did a little clearancing on the sensor housing) - should work like a charm.

Image

I mocked up the engine…the pistons sit 5 thou out of the block. So with the stock HG I'm sitting at 44 thou…so the thought is to drop the block deck height 10 thou.

_________________
Coburn Performance - OCD comes naturally.


Top
 Profile  
 
 Post subject: Re: 242 Build Thread.
PostPosted: Thu Dec 05, 2013 2:11 pm 
Haha, I just built a W24 Octo-Turbo, now what?!
User avatar

Joined: Wed Jun 14, 2006 4:19 pm
Posts: 3131
Location: Lethbridge, AB
Here's what I've come up with for a combustion chamber shape. Started with 54 cc's and ended up at 60 cc's. This shape was the best I could do in an attempt to vertically unshroud the exhaust valve. I'm not sure I'll keep the cut I made on the intake side. Probably doesn't need any help there since we're changing the air density with the turbo.

Image

Image

Piston's - old vs new…both have identical dish of 16 cc's.

Image

Image

Head with 38 mm exhaust valve.

Image

Image

Open valve…probably doesn't need to be that ramped from wall to ceiling. I'll probably calm that down a little on the finished shape. Now the problem is hitting the CR that Volvo says this engine should have (8.7:1).

96.6 mm bore
80 mm stroke
54 cc head volume
16 cc piston dish
97.95 mm fire ring
1.31 mm head gasket

This is the stock combustion chamber measurements and I get 8.34:1

7.8 with the larger combustion chamber.

_________________
Coburn Performance - OCD comes naturally.


Top
 Profile  
 
 Post subject: Re: 242 Build Thread.
PostPosted: Fri Dec 06, 2013 6:18 am 
Haha, I just built a W24 Octo-Turbo, now what?!
User avatar

Joined: Wed Dec 21, 2005 8:40 pm
Posts: 3492
Location: Calgary, Ab
If you've got 10mm clearance around the valve head at full lift, you've got enough. Any more than that is extra. One tested and derived rule of thumb I've read is 20-25% of the valve diameter. Now that you've got a valve in there it's easier to see that you've got tons and it can come back in a little if you're worried about chamber volume. I want to say keep what you've done around the plug for power, but not for efficiency. I'm no expert though.

Edit - though I have to keep telling myself that the short side radius will probably be less of an issue if more of the flow comes in from the back wall side, so keeping the meat around the spark plug may ultimately help flow through the exhaust. Man, I wish I had time and tools to measure these changes...


Top
 Profile  
 
 Post subject: Re: 242 Build Thread.
PostPosted: Fri Dec 06, 2013 5:12 pm 
Haha, I just built a W24 Octo-Turbo, now what?!
User avatar

Joined: Wed Dec 21, 2005 7:14 pm
Posts: 1875
Location: Missing my garage in Sunnyside
standard head gasket should be 1.2mm. with that and 0.005" deck height you should be at 7.96:1 with 60cc chambers. take ten thou off the deck and you get 8.12.
a little low but in a light car probably not a big deal and it will let you run higher boost!

_________________
Hi, I drive a fictional star wars character with rear wheel drive. His name is Darth Wagon, he has a shiny helmet.
Image


Top
 Profile  
 
 Post subject: Re: 242 Build Thread.
PostPosted: Fri Dec 06, 2013 8:19 pm 
Haha, I just built a W24 Octo-Turbo, now what?!
User avatar

Joined: Wed Jun 14, 2006 4:19 pm
Posts: 3131
Location: Lethbridge, AB
swedishmeatball wrote:
standard head gasket should be 1.2mm. with that and 0.005" deck height you should be at 7.96:1 with 60cc chambers. take ten thou off the deck and you get 8.12.
a little low but in a light car probably not a big deal and it will let you run higher boost!


The measurement of the gasket came from the compressed gasket…I'm assuming that my existing Elring is going to compress the few thou needed to hit 1.31 mm. There is NO WAY that thing is 1.2 mm. I'm not comfortable with 15 thou worth of rock in that piston. That's crazy poke, light or not. I'm thinking I'll just buy a Cometic at 41 thou and just have the block cleaned up (should be a thou or two). This would yield a nice squish.

I probably don't need to hog out the sides by the exhaust valve that much. I might hook up the flow bench and do some comparisons, or just shoot for 58 cc and be done with it. We can make up the flow with the 3 angle and some careful work inside. As long as there isn't a huge wall for it to face on exit, it should be fine. I have the time…mostly a question of desire to flow this head.

Talk me into it.

RSI's stage 2.

Image

Image

Image

Image

Image

Image

I freakiing love the inter web.

Image

_________________
Coburn Performance - OCD comes naturally.


Top
 Profile  
 
 Post subject: Re: 242 Build Thread.
PostPosted: Sat Dec 07, 2013 11:18 am 
Haha, I just built a W24 Octo-Turbo, now what?!
User avatar

Joined: Wed Dec 21, 2005 7:14 pm
Posts: 1875
Location: Missing my garage in Sunnyside
What gasket are you measuring? the original one you took off? I seem to recall older gaskets may have been thicker.

The last few redblock gaskets I changed started out around 0.054" new (I could be wrong about this though, I only measured the new gasket once or twice a long time ago), but used ones seemed to come out around 0.047-0.049".

I guess if you're not touching the pistons/bores and you're worried about piston rock you should be careful about tightening up squish, but how is a cometic at 0.041" (giving ~0.035" squish) any different than a stock gasket at 0.048-0.052" with -0.015" deck height?

_________________
Hi, I drive a fictional star wars character with rear wheel drive. His name is Darth Wagon, he has a shiny helmet.
Image


Top
 Profile  
 
 Post subject: Re: 242 Build Thread.
PostPosted: Sun Dec 08, 2013 10:10 am 
Haha, I just built a W24 Octo-Turbo, now what?!
User avatar

Joined: Wed Jun 14, 2006 4:19 pm
Posts: 3131
Location: Lethbridge, AB
swedishmeatball wrote:
What gasket are you measuring? the original one you took off? I seem to recall older gaskets may have been thicker.

The last few redblock gaskets I changed started out around 0.054" new (I could be wrong about this though, I only measured the new gasket once or twice a long time ago), but used ones seemed to come out around 0.047-0.049".

I guess if you're not touching the pistons/bores and you're worried about piston rock you should be careful about tightening up squish, but how is a cometic at 0.041" (giving ~0.035" squish) any different than a stock gasket at 0.048-0.052" with -0.015" deck height?


The stock gasket that came with the engine…1991 940. I measured 53 thou for the new one, so that's consistent. Anyway, it's well past where we want it to be for optimum squish. The pistons are being replaced and the bores are being re-done to match. I'm just a bit worried about having 15 thou out of the block. Probably not going to make a difference in reality…it's only 10 thou. I'm still puzzling about it. I'm sure I don't need to spend the extra $100 on the MLS.

I'm getting closer to the combustion chamber shape. This is around 58 cc, I'll refine it a little on the real head, but I think it's getting better.

Image

Image

_________________
Coburn Performance - OCD comes naturally.


Top
 Profile  
 
 Post subject: Re: 242 Build Thread.
PostPosted: Thu Dec 12, 2013 10:03 pm 
Haha, I just built a W24 Octo-Turbo, now what?!
User avatar

Joined: Wed Jun 14, 2006 4:19 pm
Posts: 3131
Location: Lethbridge, AB
I have to finish the head porting and combustion chamber modification this weekend. The H-beams are in from China - same as my much more expensive ones. I ordered a set of 3/8 - 1.5" long ARP 2000 bolts for these today. By the way, if you ever order a set, be sure to chase the threads (3/8 UNF) as I found they shot peened the rods AFTER tapping…this left the end of the threads a little rough. The rest was perfect (wrist pin fit and big end bearing fit). Powder coating and ceramic coating is also finished.

_________________
Coburn Performance - OCD comes naturally.


Top
 Profile  
 
 Post subject: Re: 242 Build Thread.
PostPosted: Mon Dec 16, 2013 3:06 pm 
Haha, I just built a W24 Octo-Turbo, now what?!
User avatar

Joined: Wed Jun 14, 2006 4:19 pm
Posts: 3131
Location: Lethbridge, AB
OK, after more research and reading I decided to go with what David Vizard says and make the valve area 20 % larger than the valve to ensure that I don't get any vertical shrouding of the head. The process started by scribing the head using the head gasket, then applying machinist blue and setting my dividers to the correct radius. Old valves (with convenient dimples in the centre) were used to scribe the outside of the head to set the limits.

The intake needed no additional work.

The exhaust only needed work up against the side of the cylinder and a touch on each side. I created more of a taper to the area around the plug (the quench pad) and all walls were tapered back to the scribe line. The rest was just cleaned up. I'll spend more time on it when the seats get cut. Most of the hard work was done by hand…compare my work to RSI's above - not that different. Hand finished with 80 grit emery. Combustion chambers don't need to be shiny.

Original shape.

Image

My shape.

Image

Image

Image

With the 38 mm valve.

Image

Now for the weird part…the chamber on the original head was 54 cc and the finished head cc'ed at 52. I know it's been milled - but that's quite a lot - so I'll have to recheck things. By the way - all chambers were within my error in measuring them for being the same. That should get the compression to where I'd like it.

Edit: A stock thickness head is 5.752" and the head is 5.724" so it's been shaved 0.028 - 0.030" (measurement error). It needs a very light clean up to deal with some corrosion from sitting. It's thinner than spec but I think it will be OK.

_________________
Coburn Performance - OCD comes naturally.


Top
 Profile  
 
 Post subject: Re: 242 Build Thread.
PostPosted: Sun Jan 12, 2014 11:43 pm 
Somehow completely sideways in 4th

Joined: Thu Nov 10, 2011 11:43 am
Posts: 248
Location: Regina, SK
Wow again...

Definitely following this engine build as well. So many things common with things I'm wanting to do on my 2.2L SOHC Turbo Peugeot engine (N9TE) for my various projects. Combustion chamber mods to stock heads, port work, changing exhaust manifold exit to a T25, and I've been looking at installing the Volvo LH 2.4 system on the engine as well - so the 60-2 flywheel was especially cool to see.

It's absurd how fast you do stuff though - holy CRAP. I'm just in awe...

Rabin


Top
 Profile  
 
 Post subject: Re: 242 Build Thread.
PostPosted: Mon Jan 13, 2014 10:39 pm 
Haha, I just built a W24 Octo-Turbo, now what?!
User avatar

Joined: Wed Jun 14, 2006 4:19 pm
Posts: 3131
Location: Lethbridge, AB
The head came back from the machine shop on Friday…apparently set up and ready to go. Well, I've got some ports to finish, so I thought do a little OHC head write up.

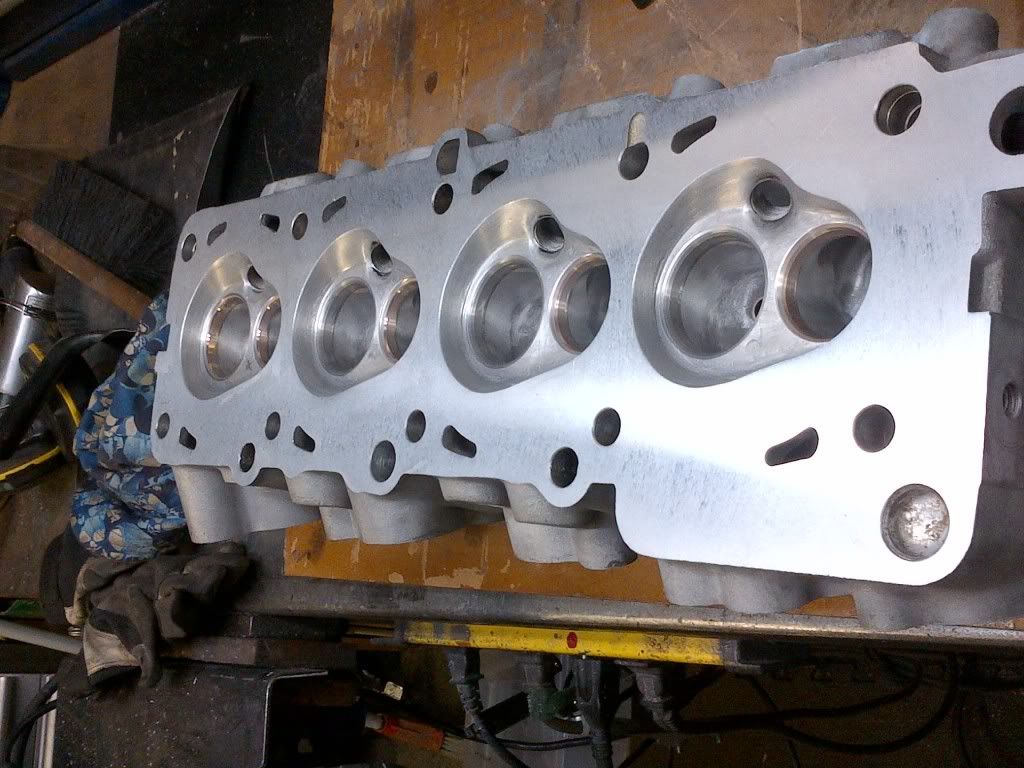
Here's the head back from the shop - note that combustion chambers are done BEFORE sending the head in to get the valves cut and the ports are done AFTER as the valve job includes a bowl cut of around 70 degrees that is necessary and better done with a valve seat machine.

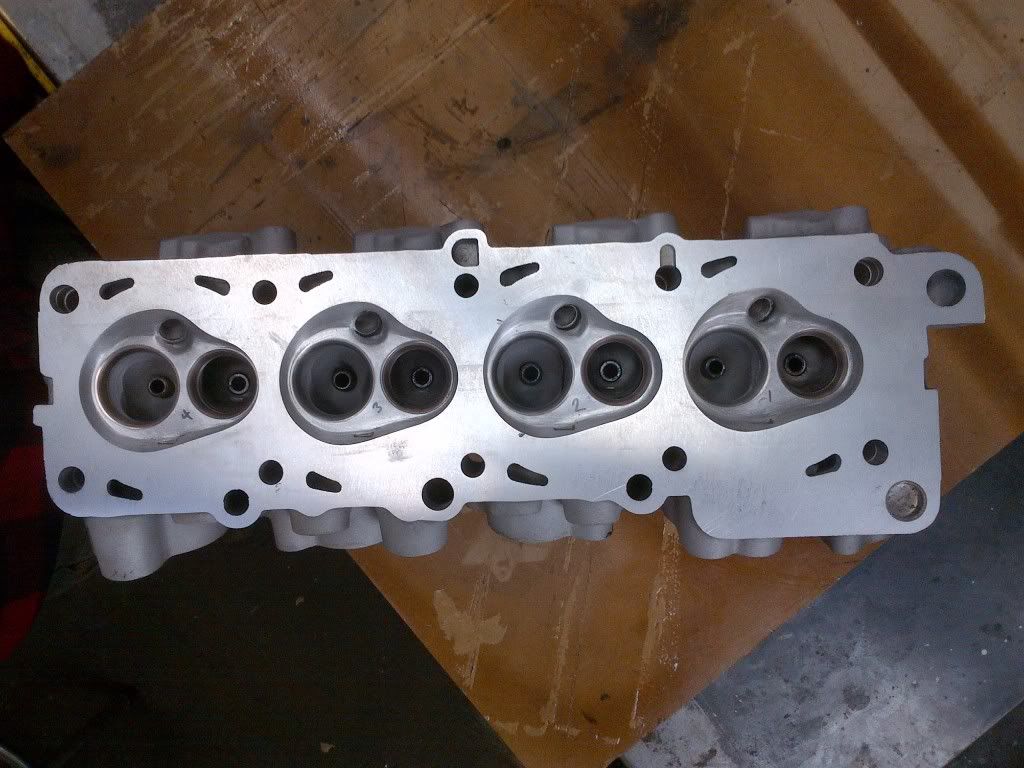
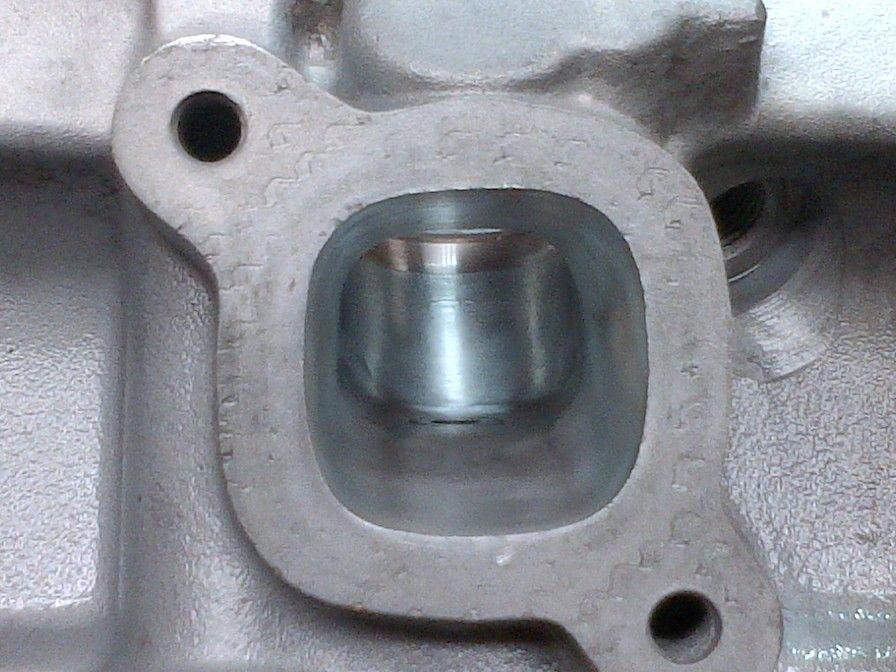
Here's the head as delivered.

Image

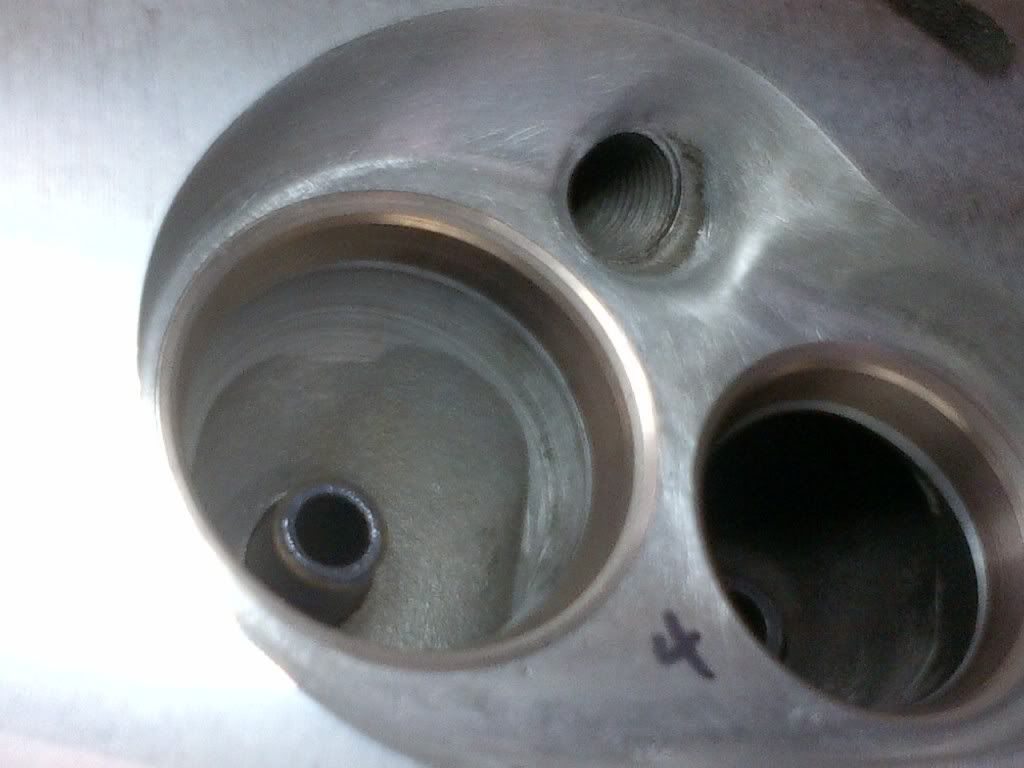
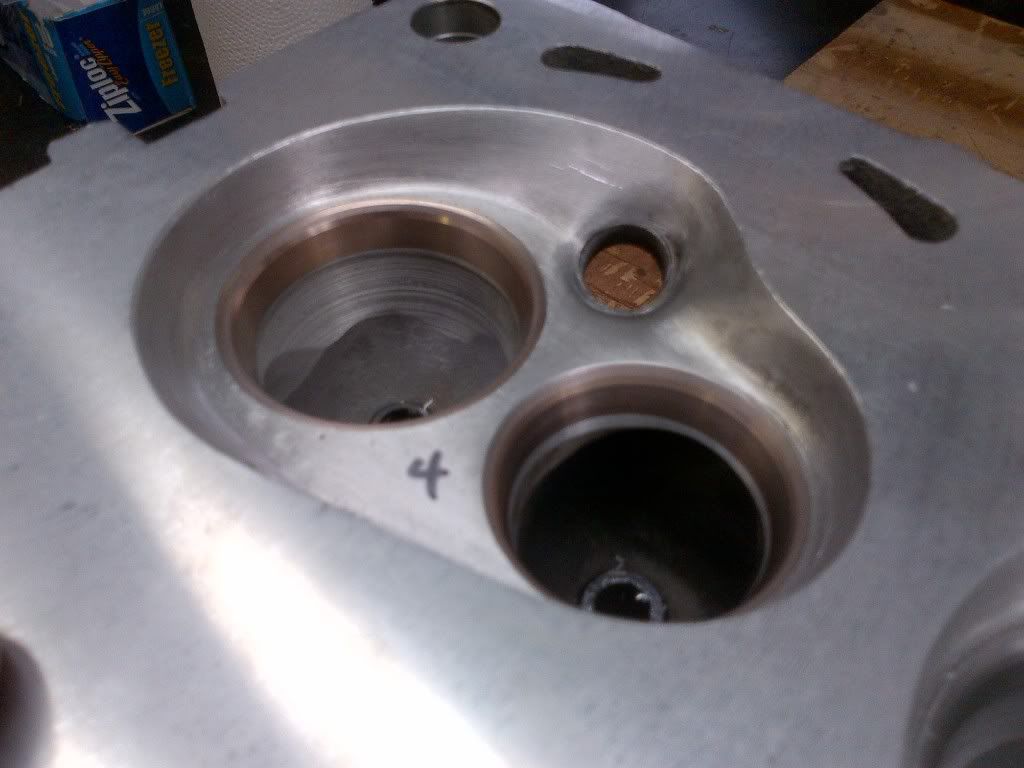
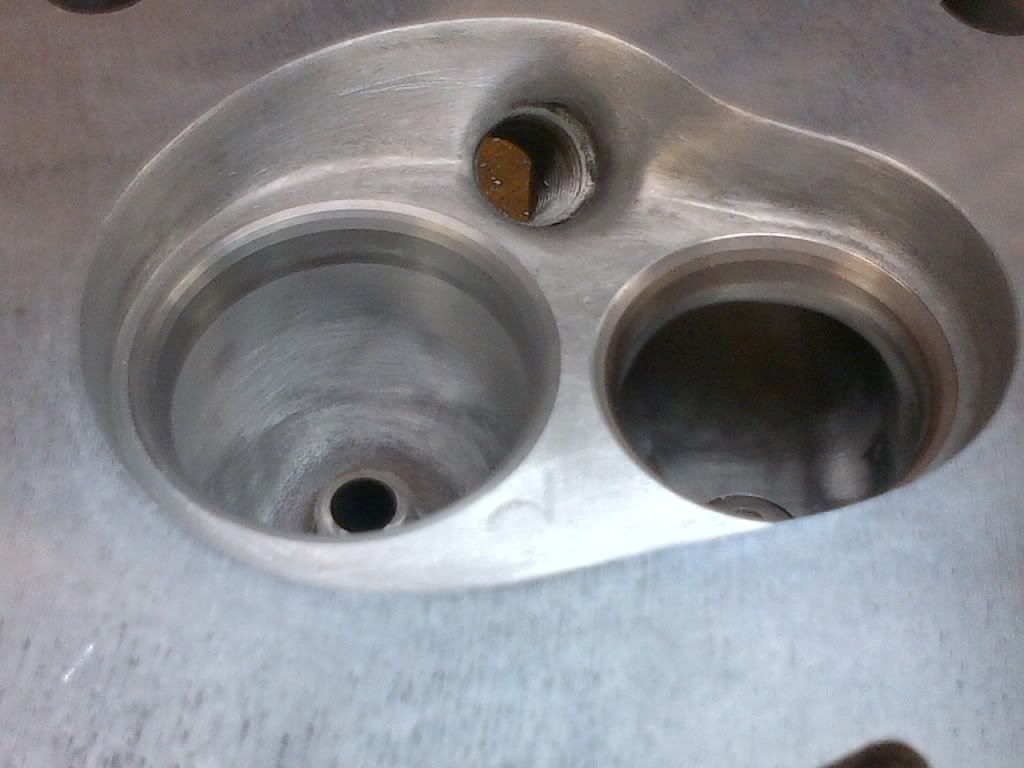
They did a nice job of the seat forms - you can see the three angles and the difference in the seat widths. I'm very happy with this work.

Image

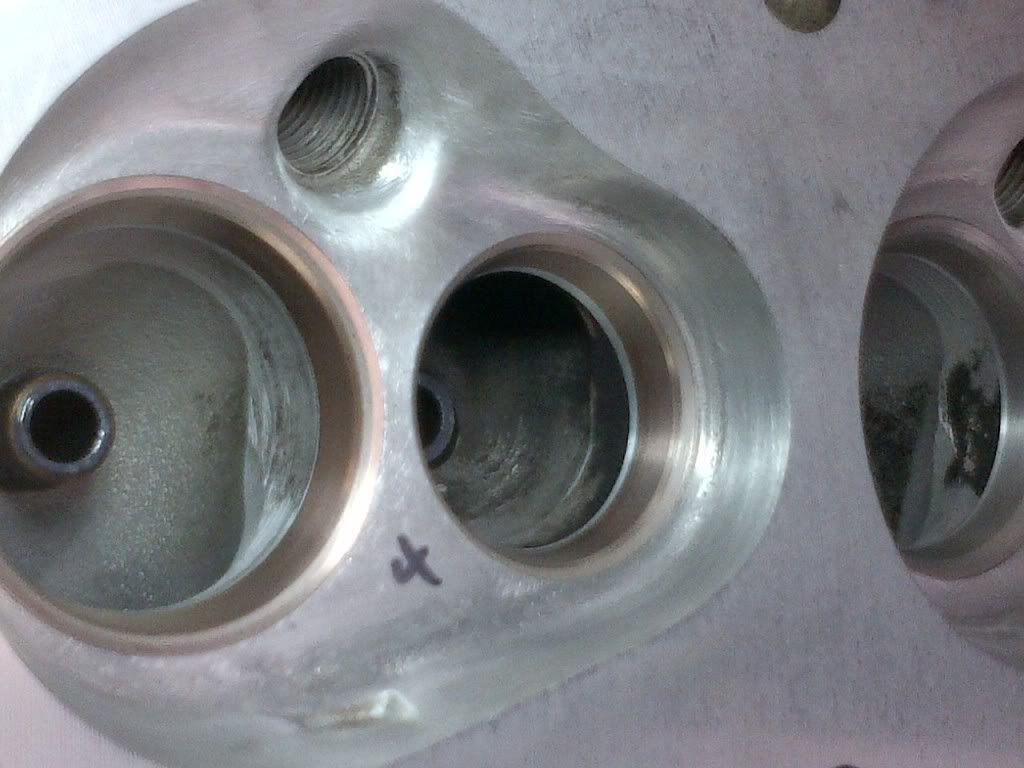
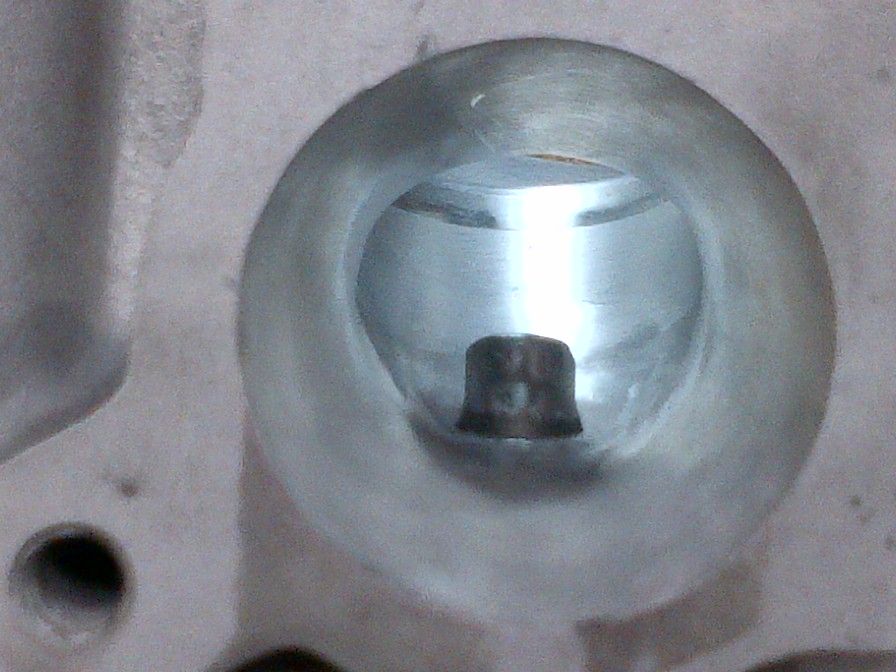
Close-up of the intake seat.

Image

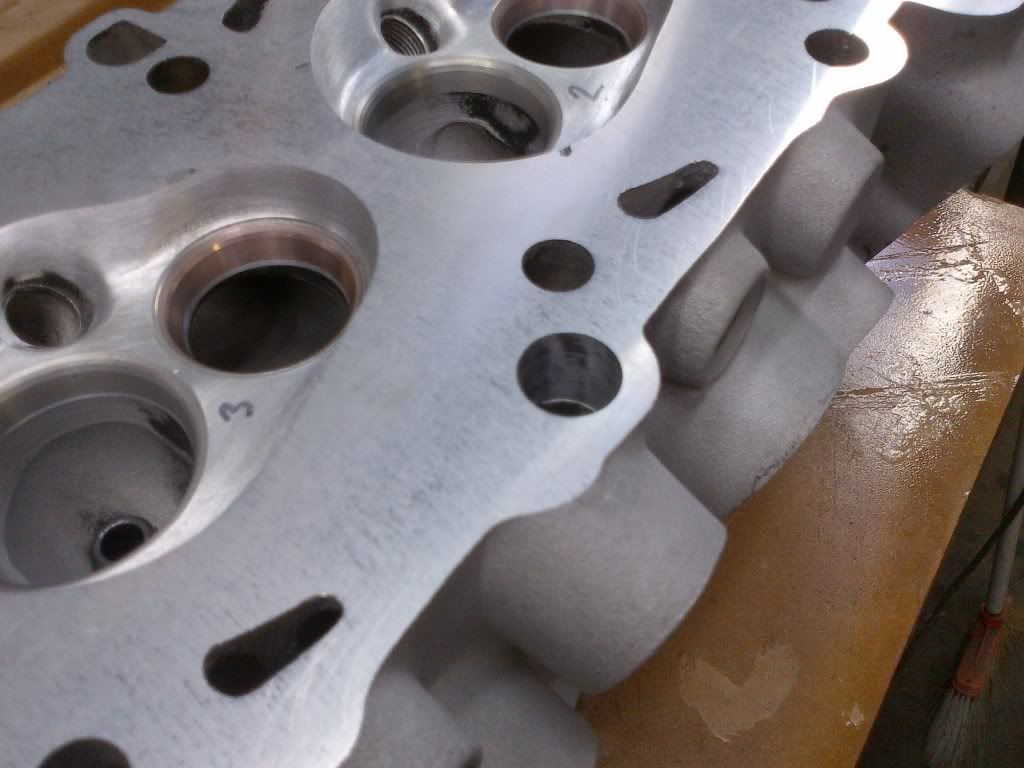
Note all the sharp edges…machine shops don't generally debur the holes - they must be done.

Image

All done. Do all the holes, coolant passages and the combustion chamber. Be very careful.

Image

Image

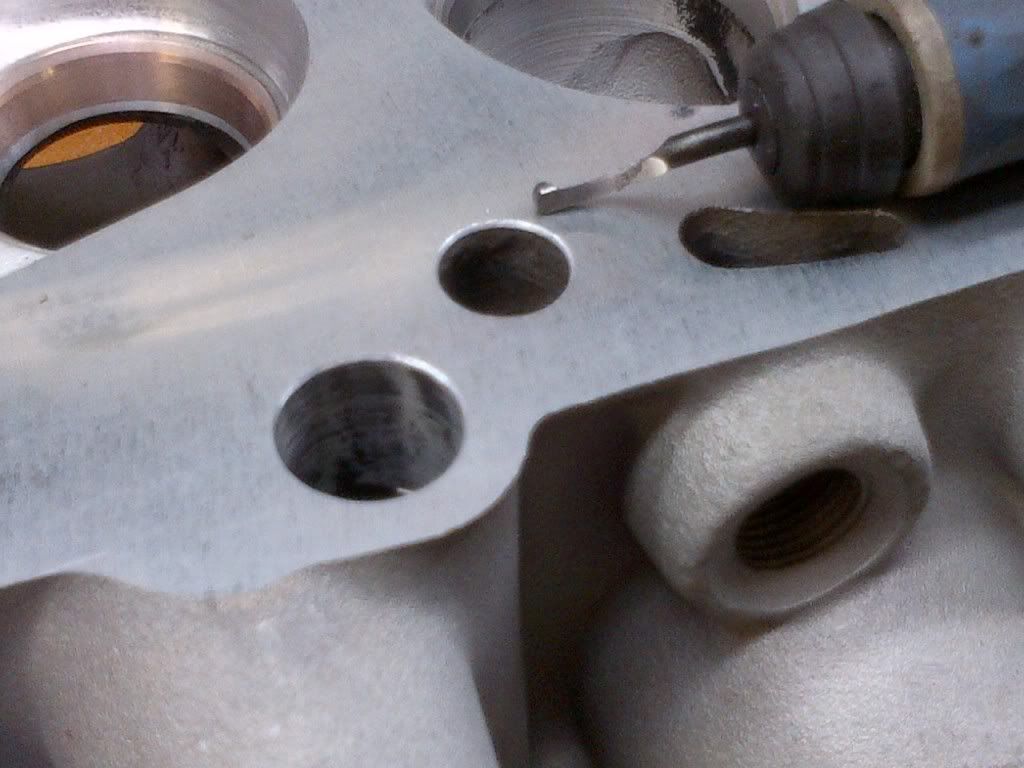
Then tape it up and go to town. The tape is there as a protective barrier against stupid #-o

Image

About 8 hours later and we're ready to clean…but first lets have a look.

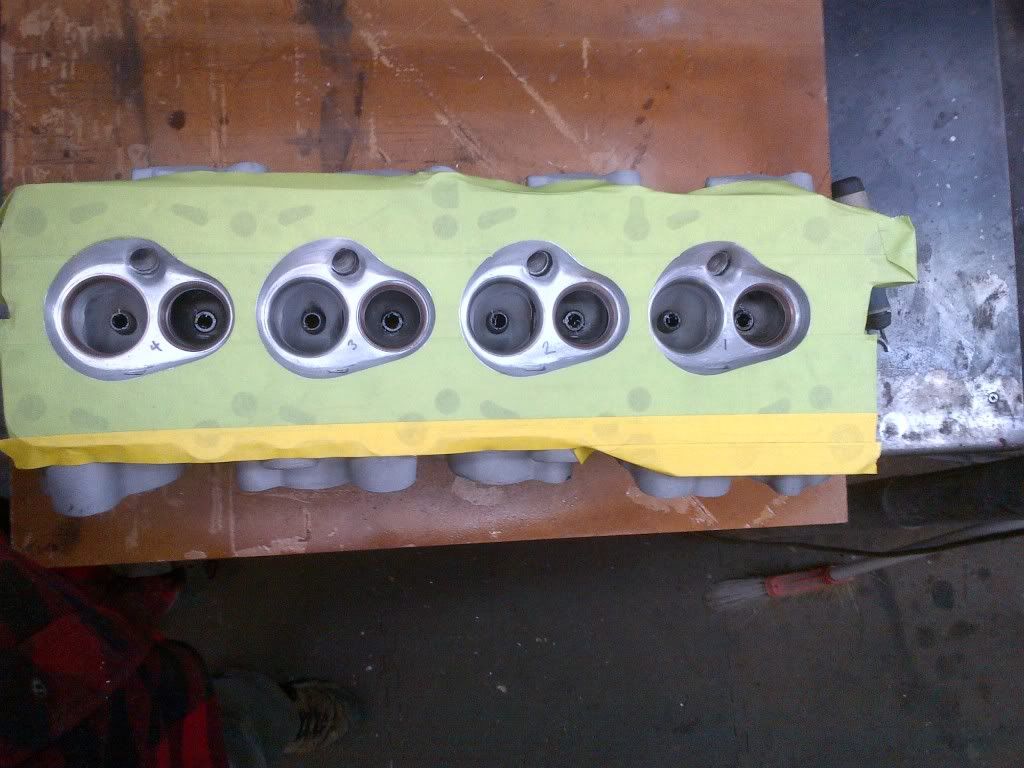
Intakes gasket matched and finished to 80 grit.

Image

You can see that I blended about half way up the bowl cut on the intake side.

Image

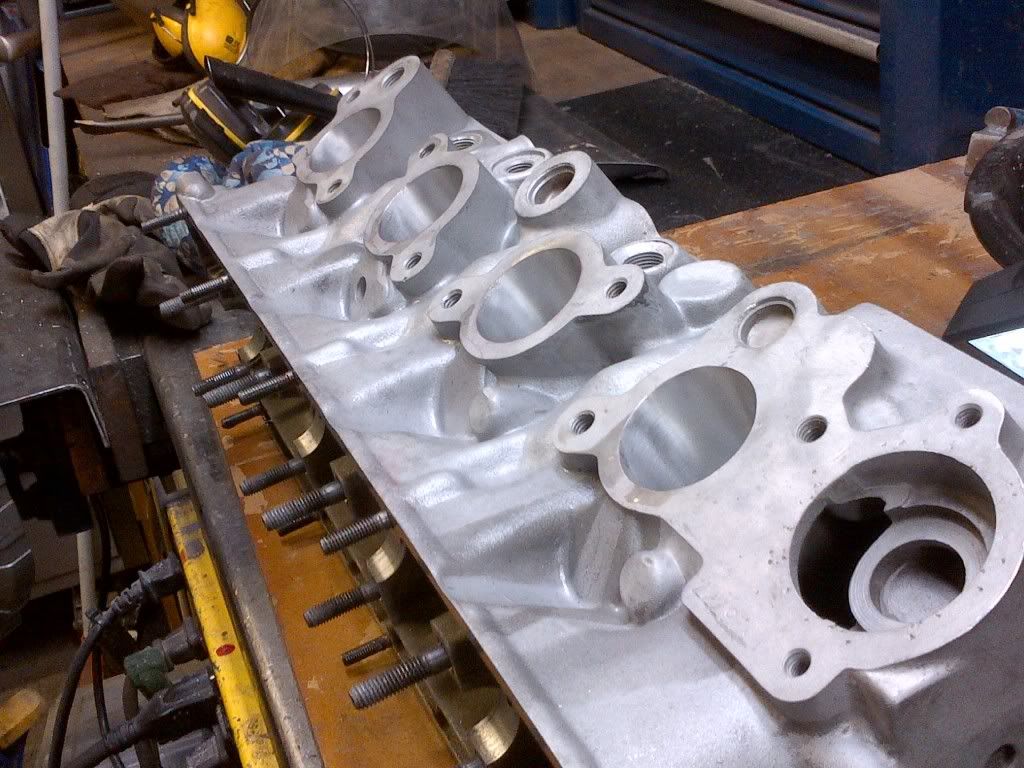
Left the reduction in the port - should work well.

Image

Exhaust side - cut the valve guide level and did the best I could with blending the short-side radius.

Image

These are not gasket matched to create a little dam that may help with reversion. Port looks pretty nice - finished 120 grit.

Image

Image

Work the sides of the pocket/bowl area - the gas has to get around the valve and out - help it.

Exhaust valves were back cut and had the head edge radiused for flow.

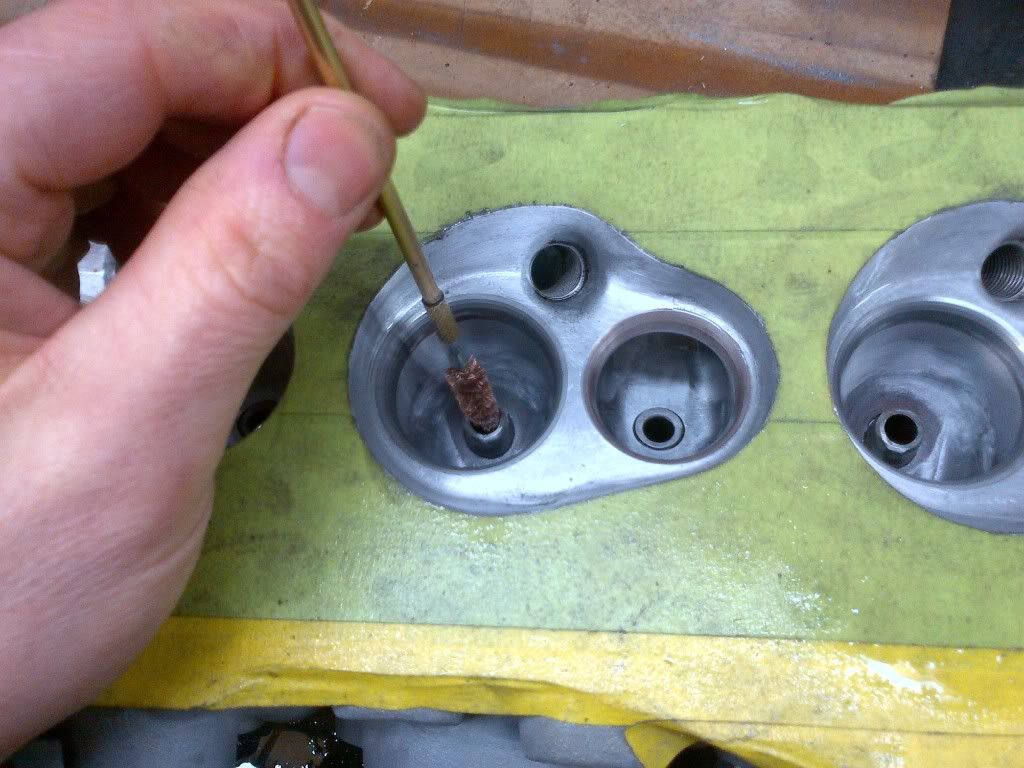
OK - once done with the pretty stuff, you have to clean. I use bore brushes to clean out the guides.
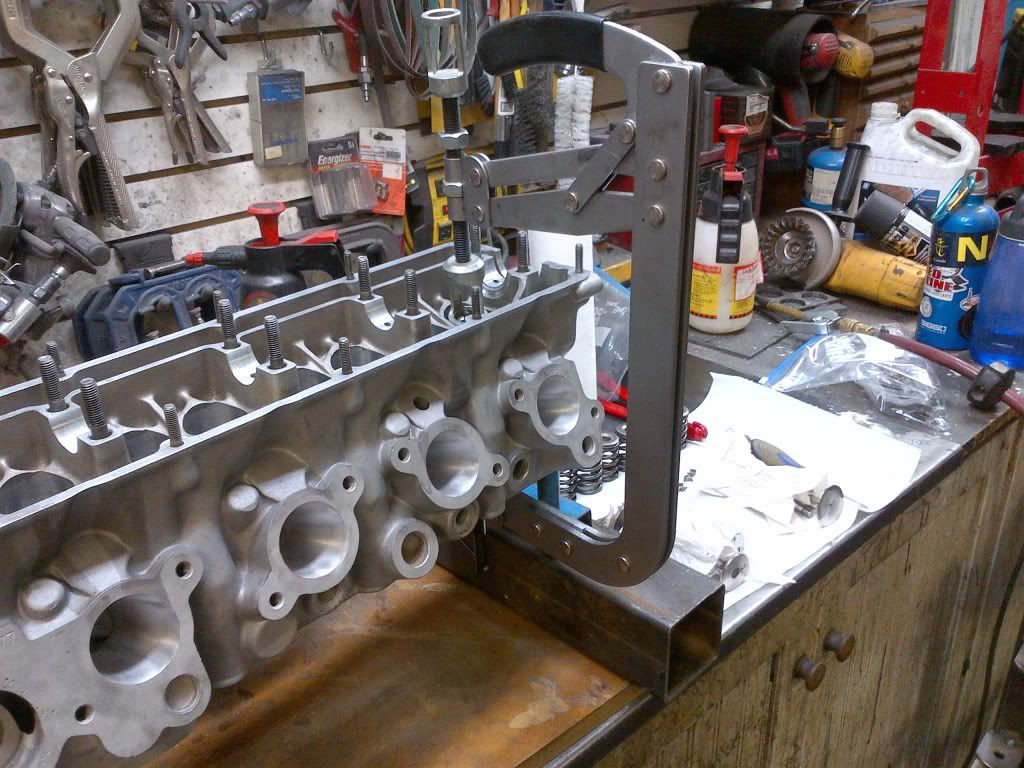
Image

Ready for assembly.

Image

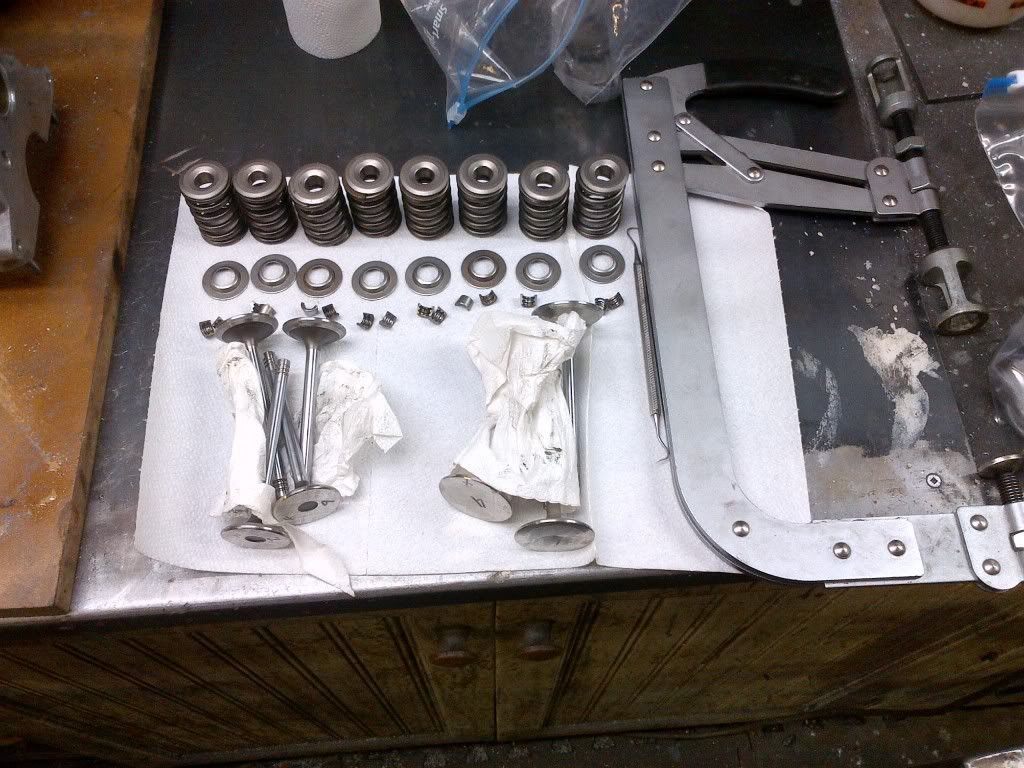
Tools and parts needed. I assemble the springs and keepers but leave the base washers off as they have to go in BEFORE the intake valve guide seals.

Image

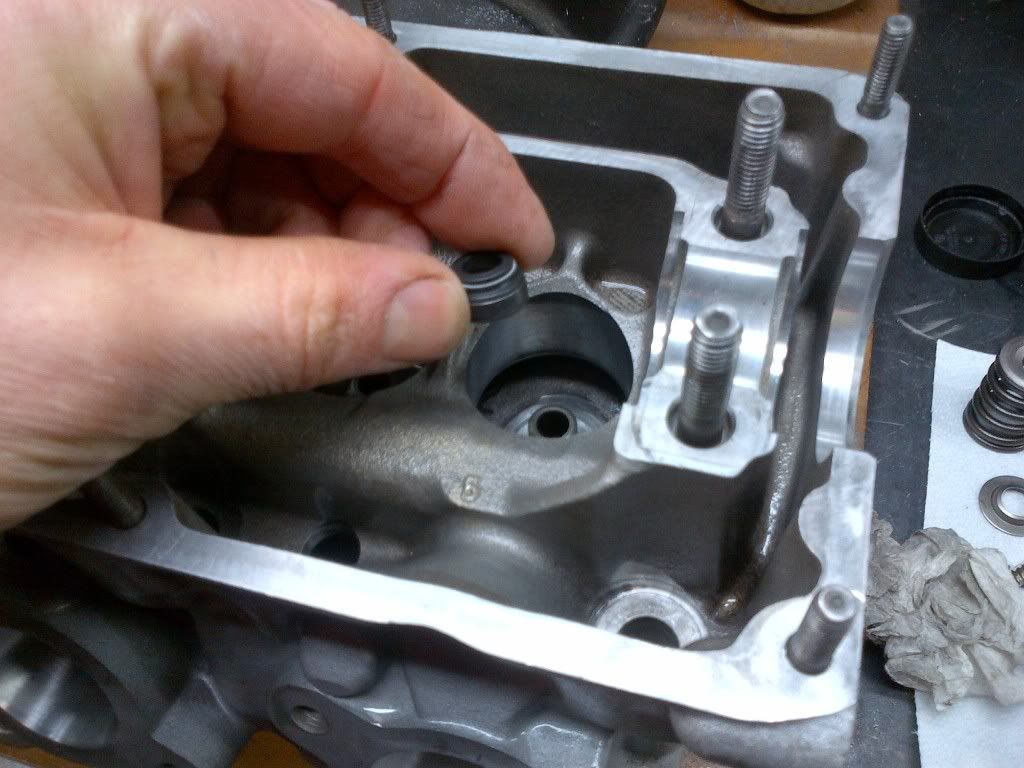
Install the base washers and then pop in the seals. Just push them on with your finger.

Image

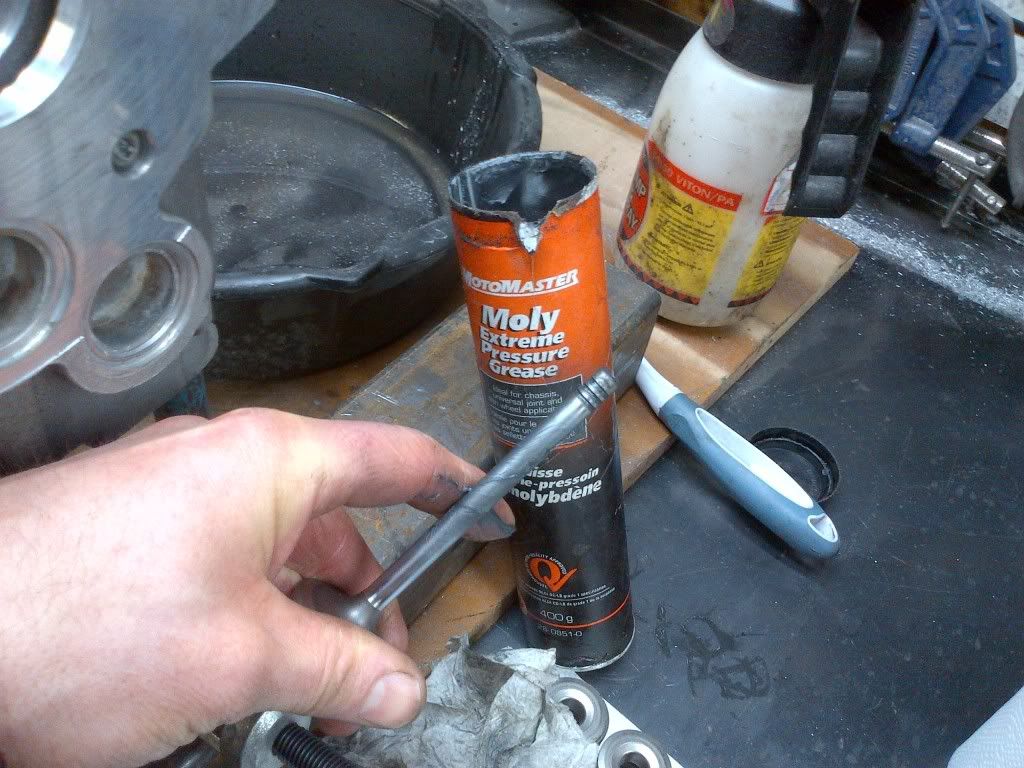
Then coat a valve stem with a little moly grease and insert (it will stay put in defiance of gravity).

Image

Then load the spring and retainer, snap on the compressor and insert the keepers. A magnetic screw driver is needed for this fiddly job.

Image

Image

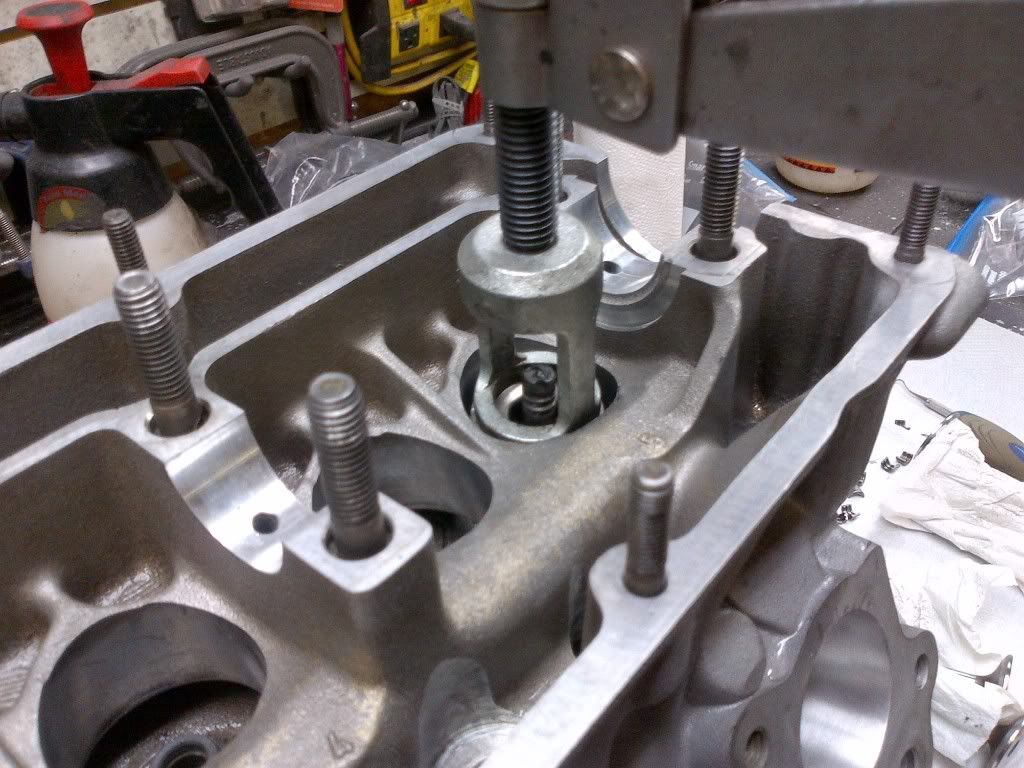
Add the buckets (I oil them first) with the shims. A good squirt of assembly lube and we can test the clearance.

Image

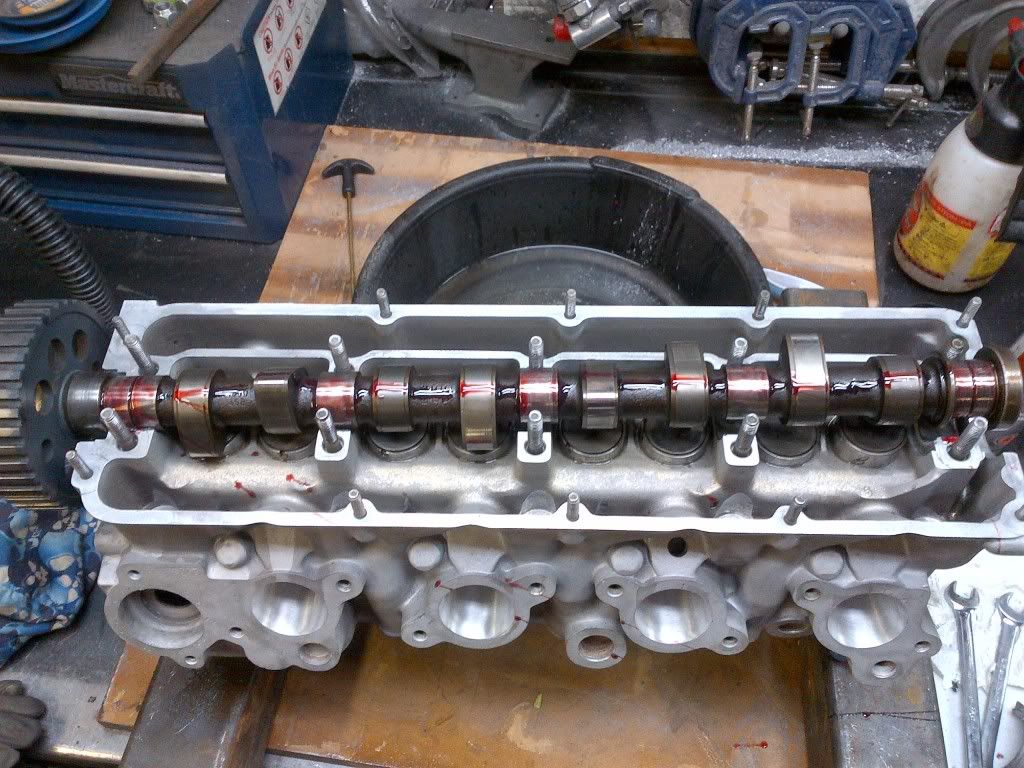
I still haven't found a machine shop that can do this properly…cylinder 1 was fine at 17 thou (should be 18…whatever). All the rest have to be set - WTF. I'll finish it up tomorrow. The valve hushers are installed after the cam is shimmed properly. Always check the machine shops work.

_________________
Coburn Performance - OCD comes naturally.


Top
 Profile  
 
 Post subject: Re: 242 Build Thread.
PostPosted: Tue Jan 14, 2014 10:11 am 
Haha, I just built a W24 Octo-Turbo, now what?!
User avatar

Joined: Thu Dec 29, 2005 12:29 am
Posts: 1790
Location: Eating tofu and legumes in my hippie shack
Very nice!

_________________
Image


Top
 Profile  
 
 Post subject: Re: 242 Build Thread.
PostPosted: Thu Apr 03, 2014 4:14 pm 
Haha, I just built a W24 Octo-Turbo, now what?!
User avatar

Joined: Wed Jun 14, 2006 4:19 pm
Posts: 3131
Location: Lethbridge, AB
I finally took the bottom end in to be machined. The 242 has been acting up and various systems are failing. I've got a power steering pump that's rattling vibrating and the car generally won't run very well. Much worse than before. I did have to repair several plug wires that were broken (which was weird), but at low revs, the car still hesitates, then starts to make power. It seems like it's missing or a plug is still fouled. It could also be K-Jet related but it's not a vacuum leak (checked with starter fluid). I've searched around and nothing else seams amiss - piston slap is now quite loud. I'm due for an oil change soon…should get the engine in May, so perhaps I'll just wait it out.

_________________
Coburn Performance - OCD comes naturally.


Top
 Profile  
 
 Post subject: Re: 242 Build Thread.
PostPosted: Sun Apr 20, 2014 11:00 am 
Haha, I just built a W24 Octo-Turbo, now what?!
User avatar

Joined: Wed Jun 14, 2006 4:19 pm
Posts: 3131
Location: Lethbridge, AB
Italian tune up and a SeaFoam treatment fixed the studded and we're back to just running OK. I'll take it for now. I also cleaned out the K-Jet stuff - this usually helps some.

_________________
Coburn Performance - OCD comes naturally.


Top
 Profile  
 
 Post subject: Re: 242 Build Thread.
PostPosted: Wed May 21, 2014 3:33 pm 
Haha, I just built a W24 Octo-Turbo, now what?!
User avatar

Joined: Wed Jun 14, 2006 4:19 pm
Posts: 3131
Location: Lethbridge, AB
Just back from the machine shop...the pistons are 6 thou clear of the new deck surface...no way that's going to be any good with the stock head gasket. I've just ordered up a 36 thou Cometic MLS from RSI - we'll see how long it takes to get it here. Now we've got squish.

_________________
Coburn Performance - OCD comes naturally.


Top
 Profile  
 
Display posts from previous:  Sort by  
Post a new topicPost a reply Page 24 of 28   [ 407 posts ]
Go to page Previous  1 ... 21, 22, 23, 24, 25, 26, 27, 28  Next


Who is online

Users browsing this forum: No registered users and 6 guests


You cannot post new topics in this forum
You cannot reply to topics in this forum
You cannot edit your posts in this forum
You cannot delete your posts in this forum
You cannot post attachments in this forum

Jump to:  
cron


Powered by phpBB © 2000, 2002, 2005, 2007 phpBB Group
610nm Style by Daniel St. Jules of Gamexe.net