Change font size
It is currently Thu Jun 05, 2025 11:38 am


Post a new topicPost a reply Page 2 of 25   [ 363 posts ]
Go to page Previous  1, 2, 3, 4, 5 ... 25  Next
Author Message
 Post subject: Re: New Toy! (220 content, pics)
PostPosted: Mon Sep 28, 2009 12:28 pm 
Whost Pore

Joined: Sun Feb 11, 2007 7:26 pm
Posts: 558
Location: E-Town
Sounds good then, my reasoning for wanting to strip large chunks of it off is that of "If one spot lifted and rusted underneath, how do i ensure another does not"

That being said, i'll get my patch panels ready and get going on this.

Anyone know if chassis drawings exist that show approximately how many/how spaced out the spot welds are in places? Or is it just go by feel?


Top
 Profile  
 
 Post subject: Re: New Toy! (220 content, pics)
PostPosted: Tue Sep 29, 2009 1:53 am 
Strapping on extra booster rockets

Joined: Sun Sep 03, 2006 8:46 pm
Posts: 360
Location: B-Ham WA/Portland, OR USA
I should add, heat gun for the sound deadening and first layer of undercoating works pretty well. I did leave that out. Thanks Craig. Don't get it too hot, just hot enough so it wants to peel with a paint scraper/bone tool, but not so hot you re-goop it and turn it into hot oil. Be patient and it can reward you with minimal fumage and fairly quick removal of the big crap. The problem with a 240 is that under the undercoating (or closer to the metal...however you want to think of that) is a texturized epoxy/seam sealer mix that you basically have to wire wheel off and dissolve the last bit of. I am not sure if 122s are similar. This is NOT fun on a car that rusted from the inside out (lack of salty rain drainage damage rather than road salt in a dry climate) where you are cleaning it off of the good metal on the car and it is stuck on there real good and won't melt easily.

WIth the sound deadening you can wait for a real cold day and pour some liquid nitrogen on it and smack it with a mallet and it will all fly off the floor without leaving any glue. Very fun. I used a heat gun this last time as it was warm out and I needed to get the car done.


Top
 Profile  
 
 Post subject: Re: New Toy! (220 content, pics)
PostPosted: Tue Sep 29, 2009 7:23 am 
Haha, I just built a W24 Octo-Turbo, now what?!
User avatar

Joined: Wed Jun 14, 2006 4:19 pm
Posts: 3131
Location: Lethbridge, AB
Ya, the stuff on the 122 is much lower tech. It is basically asphalt undercoating/roof tar. It's semi-flexible most of the time.

_________________
Coburn Performance - OCD comes naturally.


Top
 Profile  
 
 Post subject: Re: New Toy! (220 content, pics)
PostPosted: Tue Oct 20, 2009 9:39 pm 
0-60 in VERY FAST
User avatar

Joined: Mon Jul 27, 2009 10:58 pm
Posts: 158
Location: Coaldale, AB
need a parts wagon?

http://montana.craigslist.org/cto/1396966822.html

_________________
1970 Mercedes 220D
1971 Daimler ds420
1977 Mercedes 230
1979 Mercedes 300TD
1993 Honda Del Sol Si
1994 Honda Civic dx hatch
2015 Mazda CX-5
2020 Hyundai Elantra manual
1982 240 DL coupe


Top
 Profile  
 
 Post subject: Re: New Toy! (220 content, pics)
PostPosted: Tue Oct 20, 2009 10:24 pm 
Haha, I just built a W24 Octo-Turbo, now what?!

Joined: Wed Dec 21, 2005 8:03 pm
Posts: 2859
Location: T2C
Unico wrote:


Oh my...are we doing a road trip Craig?

_________________
Dale

'67 123GT
'67 122s
'99 AMG E55T


Top
 Profile  
 
 Post subject: Re: New Toy! (220 content, pics)
PostPosted: Wed Oct 21, 2009 8:25 am 
Haha, I just built a W24 Octo-Turbo, now what?!
User avatar

Joined: Wed Jun 14, 2006 4:19 pm
Posts: 3131
Location: Lethbridge, AB
Jeepers, I even have the rebuilt motor sitting in my garage. To bad there isn't room in the heard right now (I've even got a buddy in Bozeman). Sorry Eric - back on topic.

_________________
Coburn Performance - OCD comes naturally.


Top
 Profile  
 
 Post subject: Re: New Toy! (220 content, pics)
PostPosted: Wed Oct 21, 2009 9:50 am 
Whost Pore

Joined: Sun Feb 11, 2007 7:26 pm
Posts: 558
Location: E-Town
Craig, that one looks decent!

I put in my order with olof, and have beeen practising welding sheet for the last little while in anticipation of the new bits :D

In the meantime i finished wiring 220v in the garage, started playing with a stick welder (Super easy compared to the 120v mig for anything over 1/4") and setup the air compressor...

As far as right now goes, i'll be putting the motor in the PV someday after this current run of midterms calms down a bit. just fish-mouthed the first tube last night!

And turns out i'm going back up to fort mac instead of yellowknife, so i'll still be getting progress done on these things between january and august this year!

I am tempted to fix the brakes in the 220 wagon and drive it up this winter and then undertake some of the rust repair there (I do have a heated garage there... and the 220cu.ft cylinder and a mig welder could easily replace some clothes for what i pack up there...)


Top
 Profile  
 
 Post subject: Re: New Toy! (220 content, pics)
PostPosted: Fri Oct 23, 2009 3:31 pm 
Whost Pore

Joined: Sun Feb 11, 2007 7:26 pm
Posts: 558
Location: E-Town
Sweet, found some mkIII supra suspension/xmember, it's coming home tomorrow, and best of all, the darn thing'll fit too I think! may need to make some shorter struts for it, but other than that it looks good, what a pain in the ass to pull.


Top
 Profile  
 
 Post subject: Re: New Toy! (220 content, pics)
PostPosted: Tue Nov 03, 2009 6:22 pm 
Whost Pore

Joined: Sun Feb 11, 2007 7:26 pm
Posts: 558
Location: E-Town
haha, VIP came through, got my new inner wings and rockers and 1/2 of the wheel arches today, i'll be fitting those probably sometime during the fall break.


Top
 Profile  
 
 Post subject: Re: New Toy! (220 content, pics)
PostPosted: Mon Apr 19, 2010 5:40 pm 
Whost Pore

Joined: Sun Feb 11, 2007 7:26 pm
Posts: 558
Location: E-Town
well, due to some financial setbacks, the PV will be sitting a little while longer until i can afford more parts,


BUT since i've got a full tank of mig-mix, a bunch of sheet metal, and the odd 3-day weekend, it looks like i'll be patching up some bits on the amazon!

there are 4 main "Bad" areas...

the outer half of the firewall (outside of the frame spars inside of the A pillar) on the passenger side seems to have a nice sized hole in it and the fender mounts are rusted in the usual spot. I have the new rails/mounts from olof (though they are already welded together, what do you guys do for the inside treating of the metal?).

The rockers/wheel arches need to be done


and the rear inner "butt cheek" type things/frame rails the where the rear bumper mounts is rusted on the passenger side.


That being said, from those who have torn into these cars, what would be the most logical plan of attack?


I'm thinking pulling the back half of the interior, dropping the tank and tackling the rear bits that are dodgy first, nothing exposed, get a feel for the car/etc.... and see how problematic it actually is. Then working my way onto the firewall, then getting it on the road taking care of the non-existant brakes, a good tune-up/etc (are new master cylinders/calipers available easily or should i be cannibalizing the good parts of the rusty 122 i have out at the farm?) and then tackling all the nitt-gritty bodywork type stuff (rockers/arches/rust around the edges of the nose cone and fenders) on a case by case basis.

Does that seem logical/reasonable? The goal for this car would be a good solid volvo platform, no pipe-dreaming engine swaps (well, hey, possibly a b21/t5 i've got sitting in the garage on a stand, but nothing planned at the moment) and just have a good solid driving car for crusing around a little bit this summer. Is there any hidden stuff that i should be watching out for with the rust in these areas?

the first plan of attack is to expose the problem areas, figure out how bad they actually are, and see what i can do to fix them up. I'm not looking for a craig-style meticulous restoration, but for something solid, practical, and that will leave me the option to go spend the long long hours later on to get up somewhere close to that level? I'm feeling much more confident with my welding skills, and can now lay consistently good and fairly flat beads on 16-20ga sheet. Still struggling a bit with finer, but i'm getting it.

Sorry for the long post!


Top
 Profile  
 
 Post subject: Re: New Toy! (220 content, pics)
PostPosted: Sat Apr 24, 2010 2:20 pm 
Whost Pore

Joined: Sun Feb 11, 2007 7:26 pm
Posts: 558
Location: E-Town
Image
Image
Image
Image

got a chance to have a look at things today.... need some opinions...

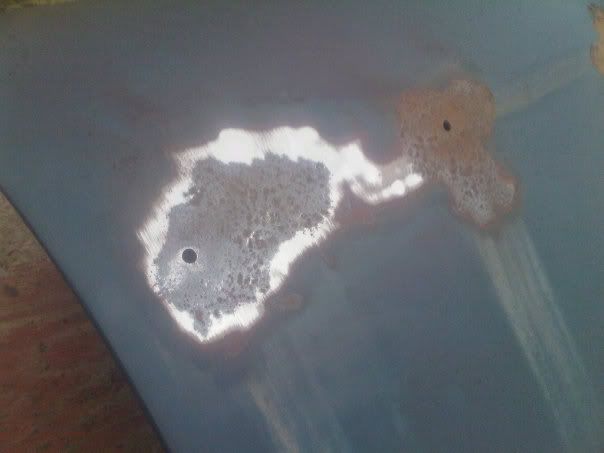
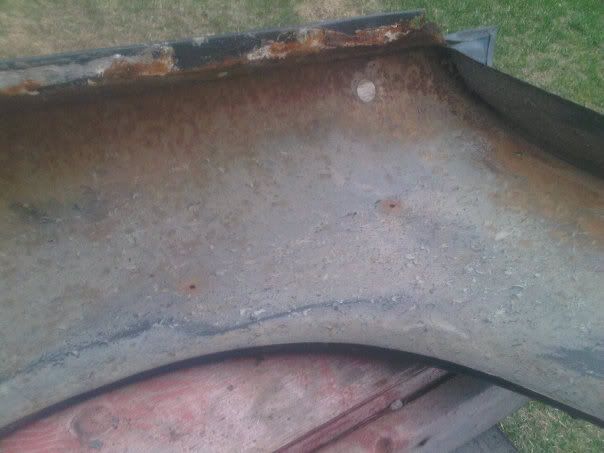
the fender is relatively solid, but it is rather pitted.

is my best plan of attack to use phosphoric acid on these spots and then glazing putty to fix it out?

or am i best off to be cutting and welding?

my gut says the prior, KISS principle, since the metal is fairly thick and a dental pick could not be pushed through anywhere.

As well, how on earth can i strip the undercoating from the backs of the fenders? i imagine it'd be hard to use a 36-80 grit wheel on the concave surface...

and the bottom corner of the fender where all the road muck seems to collect at the back, is there any solutions for cleaning that out aside from liberal amounts of compressed air and probably phosphoric acid followed by epoxy primer?

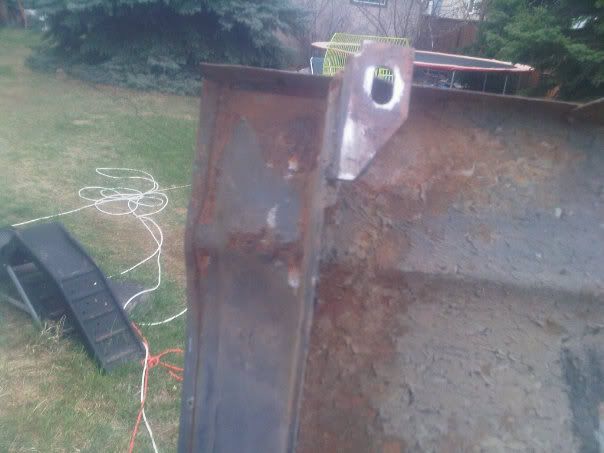
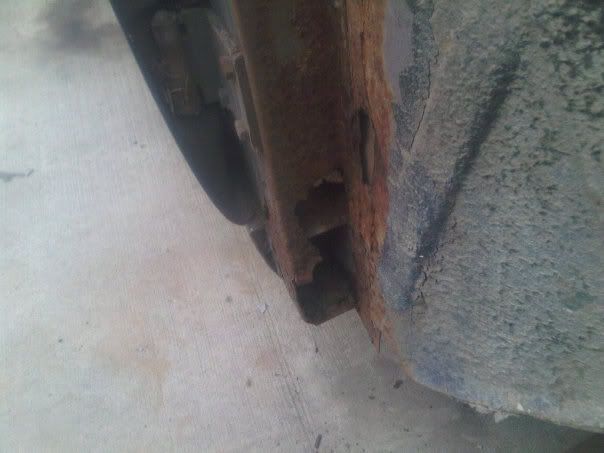
Now, the slightly tougher one, the bottom of the A pillar...

that is how it looks, the inner structure appears to be galvanized and in pretty decent shape. It looks like i will simply have to pull the door and patch it up as necessary, does this seem right?

There is also a hole that goes through to the cowl, but on the underside of the dash, there appears to be a big "pocket" of metal that tapers back into the firewall by the heater vents, does anyone know what this is? it appears to be a structural piece that is spot-welded in.


thanks


Top
 Profile  
 
 Post subject: Re: New Toy! (220 content, pics)
PostPosted: Sat Apr 24, 2010 4:57 pm 
Haha, I just built a W24 Octo-Turbo, now what?!
User avatar

Joined: Wed Jun 14, 2006 4:19 pm
Posts: 3131
Location: Lethbridge, AB
Hey Eric,

That doesn't look good...at this point your best bet is to use a sandblaster to remove the rust. Acid dips etc are excessively messy and a real pain. That A-pillar is a common rust area and is very important structurally, get that cut out and welded up with the right gauge of metal. I'd makes sure the entire car is properly supported when doing it as well. Check your door and hood gaps and make sure everything is sound. Plug welding is an acceptable alternative to spot welds - just make them big (say 3/8 to 1/2 in diameter) - seam welding after is not going to hurt anything.

Oh and take that tube of glazing putty and toss it - modern products are just fine after you get it epoxy primed. I've been using body icing by ICI and it's great (just thin filler), but you can fill pitted metal with it and barely have to sand.

Lots of work ahead.

_________________
Coburn Performance - OCD comes naturally.


Top
 Profile  
 
 Post subject: Re: New Toy! (220 content, pics)
PostPosted: Sat Apr 24, 2010 6:27 pm 
Whost Pore

Joined: Sun Feb 11, 2007 7:26 pm
Posts: 558
Location: E-Town
lots of work, but i've only got time right now, and have supplies and fresh sheet metal. And yes ICING! that's what I use as well, big ol' white tube with neon striping on it, AWESOME stuff.

any cheapo sandblasters/grits you can reccomend? I've got a PA siphon feed one that seems to work alright.

yeah, that a pillar area looks to be like 16 gauge or so, but isn't too bad. The plan of attack for that was going to be pull the door off, tack a spare piece of square tube across between the hinges, use a jack to pull the weight off underneath on the rail towards the centre of the car, and then patch it up.

Surprisingly, the floors are all very good in this car, it seems like the majority of the rust is from sitting for so many years with silt plugging up all the drainage places and condensation, I reckon both the fenders are fairly salvageable, the nose cone needs some repair in the non-visible areas by the mating surfaces, but is otherwise good.


So plan of attack so far:

1) A pillar rust
2) inner fenders/firewall/patch in cowl
3) rear inner spare wheel wells.
4) Rockers
5) Arches

I totally sat in there and made vroom vroom sounds for like 20 minutes today, and was amazed at the amount of headroom it had.


Top
 Profile  
 
 Post subject: Re: New Toy! (220 content, pics)
PostPosted: Sat Apr 24, 2010 7:24 pm 
Haha, I just built a W24 Octo-Turbo, now what?!
User avatar

Joined: Wed Jun 14, 2006 4:19 pm
Posts: 3131
Location: Lethbridge, AB
I've had the best results with 60 grit green blast from PA. 16 sounds about right, but don't take the door off unless you've got to, that way you can check and make sure things are welding up OK.

_________________
Coburn Performance - OCD comes naturally.


Top
 Profile  
 
 Post subject: Re: New Toy! (220 content, pics)
PostPosted: Mon Apr 26, 2010 7:28 pm 
Whost Pore

Joined: Sun Feb 11, 2007 7:26 pm
Posts: 558
Location: E-Town
one more afterthought, how high up would you reccomend going on the A pillar repair, up to the top of the bottom hinge?

is there any particular internal panel treatment i should use there? is there anywhere else it is accessable to coat after the fact?


Top
 Profile  
 
Display posts from previous:  Sort by  
Post a new topicPost a reply Page 2 of 25   [ 363 posts ]
Go to page Previous  1, 2, 3, 4, 5 ... 25  Next


Who is online

Users browsing this forum: No registered users and 2 guests


You cannot post new topics in this forum
You cannot reply to topics in this forum
You cannot edit your posts in this forum
You cannot delete your posts in this forum
You cannot post attachments in this forum

Jump to:  
cron


Powered by phpBB © 2000, 2002, 2005, 2007 phpBB Group
610nm Style by Daniel St. Jules of Gamexe.net