Change font size
It is currently Sat Jun 15, 2024 2:50 pm


Post a new topicPost a reply Page 5 of 20   [ 289 posts ]
Go to page Previous  1, 2, 3, 4, 5, 6, 7, 8 ... 20  Next
Author Message
 Post subject:
PostPosted: Thu Jan 15, 2009 9:57 am 
Haha, I just built a W24 Octo-Turbo, now what?!
User avatar

Joined: Thu Dec 29, 2005 12:29 am
Posts: 1790
Location: Eating tofu and legumes in my hippie shack
:lol:
Thanks Athal! And thanks Dale and Matt! Sweeet!!

So its not from your old 245 then?

Well, another adventure last night. I pulled the feed hose for the pump, unthreaded the little feed post from the tank, and poked around. Not much fuel coming out. I pushed about a foot of clothesline in there, and fuel started coming out more readily. I can't figure out if there's a screen or a baffle back there or what. No idea if you could even reach the screen from the sender.

At any rate, I started it up...it ran somewhat differently, but not a whole lot. I planned to take it for a quick boot down the alley, but promptly got stuck! I killed the car to get Laura, and then it wouldn't restart. Sweet. After phoning Craig, I jiggled a few wires, and it suddenly started. What the? Time to clean some grounds I guess. That, and I believe this car may have a fear of the Coburn!! :lol: It knew it had better run or else! Thanks for coming over to help Craig.
At any rate, it still runs like crap, so onward with a new tank and pump.

_________________
Image


Top
 Profile  
 
 Post subject:
PostPosted: Wed Jan 21, 2009 7:40 pm 
Haha, I just built a W24 Octo-Turbo, now what?!
User avatar

Joined: Thu Dec 29, 2005 12:29 am
Posts: 1790
Location: Eating tofu and legumes in my hippie shack
BWAHAHAHAHAHAH!!! :twisted: She's a beaut! Look at the colour! Damn.
Image
Image
Image
Image

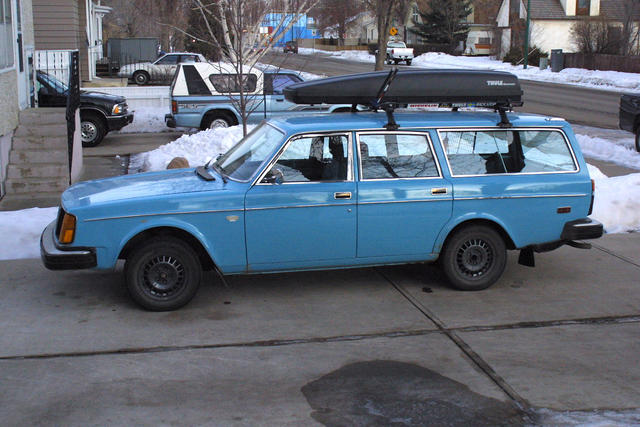
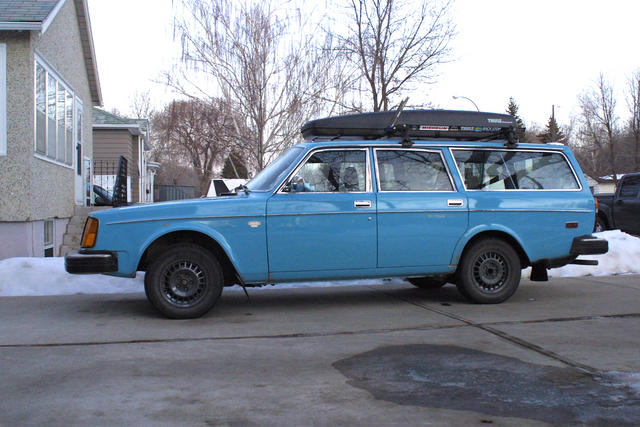
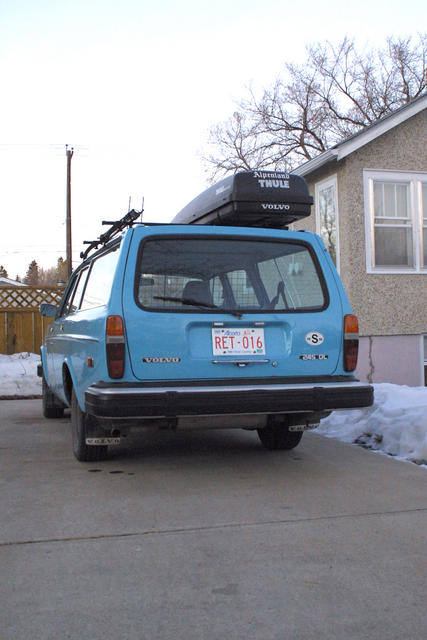
Yes indeed. The car is on the road! Registered and insured as of Monday, and aligned as of today. 90+ windshield goes in tomorrow. Inspection is Tuesday, and I'm rolling.

So, here's whats happened. Dale brought down a tank on the weekend, which had a pump and sender inside. I took the unit out of the tank, and the thing was whisper clean inside. Spotless. Craig re-wired some corroded bits on the harness, checked the sender resistance, and then I spent the rest of the weekend putting the tank in.

Couple problems:
-running hose from the top of the tank to the main pump at the side. Easily solved.
-wiring the in-tank pump. As the relay has no provision for a second pump, I ended up running a single wire from the pump to the fuse box, fuse #5, so the pump will run whenever the key is in position 2. Not ideal, but I just won't leave the key there for long. In retrospect, in might have been easier to just splice into the main pump wire for power, and then the in-tank would have been switched too. But I guess this way primes the pump a bit before the main pump goes off.
-vacuum lines. The '75 tank has a check valve on the top that junctions in the filler line, and the sender vacuum lines before they head to the charcoal canister. The filler line runs through a slight indent in the filler neck rubber gasket. Since I was switching to the later filler neck, it didn't have this indent, as the later cars had a rubber grommet through the sheet metal next to the filler neck which then goes to the canister. Since the '75 doesn't have this, I ended up just running the filler neck line to the butt check drain hole, and the sender line to the canister. Anybody know if I actually NEED both of these? I'm hoping to delete the filler neck line.
-filler neck has a different rubber seal at the gas cap which I still need to source.

At any rate, putting this all in took me a little while. Mostly getting the clamp where the filler meets the tank was a pain. After it was all in, the car started fine, but actually idled WORSE. Go figure. Throttle response was better, but off throttle it sounded like it was about to backfire....almost popping. The car was GUTTLESS. After a short drive over some rough ground, parking, and then starting again, the idle leveled out right around 1000 rpm, and the car felt like it had a lot more juice...98 hp worth of juice. Sweet! I dunno what happened, but something in the CPR got shook loose or something. Immediately things were better. It purrs quite smooth, and except for a couple small exhaust leaks, is really really quiet. The main pump is now quiet, and both pumps appear to be running good.

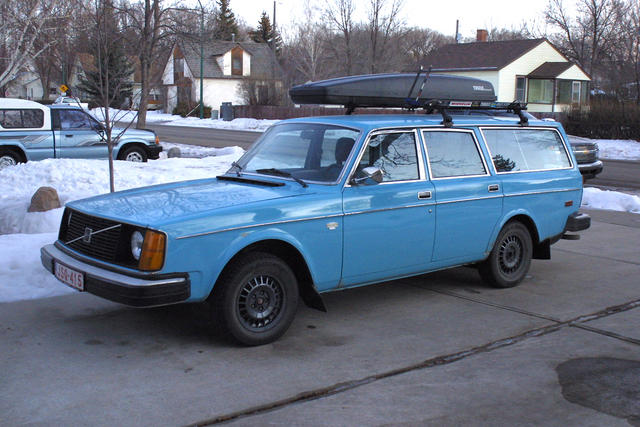
Since then, I've cleaned up some grounds, cleaned around the starter, cleaned up the idle control valve, and got the alignment...the car was wicked sketchy on ice. Scary times.

Alignment dude couldn't get camber to within spec which sucks. The HD springs are really high in the front, which I wanted, but they probably aren't helping the camber situation. If they settle at all (they're brand new) hopefully the camber will level out to a little better than +1 degree.

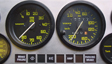
Oh, and here's the money shot....
Image

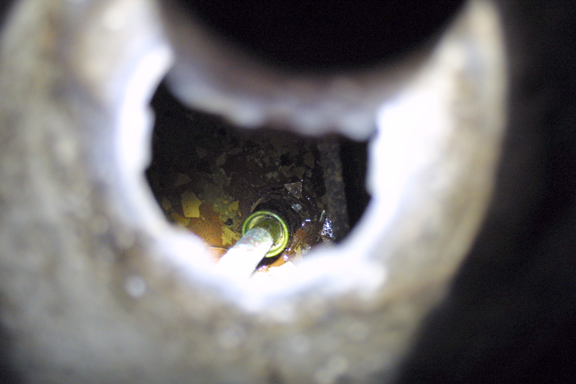
That's the pickup tube in the '75 tank. I think Matt was on the money with the sheets of varnish coming off from the unleaded fuel. In addition to lots of corrosion, the whole tank is full of what appears to be large flakes of paint. And the majority of them were at the pickup, blocking....well...pickup. Glad I ditched that.

What's left? I've got a short that turns the seat belt light on and turns on the belt buzzer anytime I'm in gear. For a while today it was on constantly. Good times. Odometer and gas gauge work, although the speedo is at least 10 km/h off at this point. And a black leather interior should be in in the next couple weeks. I'll be sad to lose the blue, but the seats are pretty cracked, so they've gotta go.
I'm stoked.

_________________
Image


Top
 Profile  
 
 Post subject:
PostPosted: Wed Jan 21, 2009 8:02 pm 
Strapping on extra booster rockets

Joined: Sun Sep 03, 2006 8:46 pm
Posts: 360
Location: B-Ham WA/Portland, OR USA
Nice job! That is definitely one of the less fun tasks to swap out an early tank. I'm pretty fast at it, so I guess I made it sound easier than it was. I'm prone to forget some struggles. You illustrated the struggle well.

On the chassis on most of the later cars near the tank, there is what is called the "roll over valve" that goes inline to the line going from the fuel tank (I think the filler neck on the late tank really) to the charcoal canister and it does what you'd expect...closes when you roll the car (valve) over. Running sans charcoal can hooked to the filler neck can be not so good for environmental reasons if you top it off or if you get lots of evaporation in hot weather in the summer it could be less than safe. In the winter I wouldn't worry, but I don't always err on the side of emissions/safety. My car has no charcoal can, cat or crankcase vent hehe. Cars of the 60s have basically what you have..if you top the filler off it just runs out onto the ground. The charcoal can just lets the engine gradually re-breathe fumes of one kind or another.

The extra line spot on the sender top on the later tank is for the "fuel leakage hose" at the back of the fuel accumulator (which the 240 bentley discusses in depth in the 240T k-jet chapter). The accumulator shouldn't leak at all or measurably if it is working right. But, that hose is there for both safety should it leak and being able to easily pull that line and diagnose a bad accumulator. mid-1983 and later turbo cars do not use a leakage hose and have a plug in the back of the accumulator, though if one of those is rusty/crusty enough it will ooze when it fails...seen that on a couple 240Ts I've fixed. Running a line from there for the charcoal can should be legit.


Last edited by 945_James on Wed Jan 21, 2009 8:12 pm, edited 1 time in total.

Top
 Profile  
 
 Post subject:
PostPosted: Wed Jan 21, 2009 8:12 pm 
Whost Pore
User avatar

Joined: Tue May 06, 2008 6:54 pm
Posts: 579
Location: Brentwood
man,

I have to replace/ patch the tank on my 245 as well. every time its more than 3/4 full it leaks. I get a headache driving it around when its full...

not fun.

_________________
__________________________________________
Alex

87 245, +t 517k
83 242t Project


Top
 Profile  
 
 Post subject:
PostPosted: Thu Jan 22, 2009 6:10 pm 
I can fix the world
User avatar

Joined: Thu Dec 22, 2005 12:18 pm
Posts: 1461
Location: Calgary
I just did exhaust gaskets on a redblock today, turned out sexy quiet ;)
Looks good though, that old tank is nasty

_________________
2006 Subaru Sti


Top
 Profile  
 
 Post subject:
PostPosted: Sat Feb 14, 2009 10:46 am 
Haha, I just built a W24 Octo-Turbo, now what?!
User avatar

Joined: Thu Dec 29, 2005 12:29 am
Posts: 1790
Location: Eating tofu and legumes in my hippie shack
Thanks James. I appreciate your explanation on the whole vent thing. I'm still a little concerned about it, and will look into seeing if my accumulator has another line coming off of it. I don't remember seeing one, but I'll check it out.

Last time I was in Calgary, I pulled a bunch more stuff at the PYP. I got the filler neck gasket that sits behind the gas cap, and MAN, that thing is a pain to put in. Pulling it out of the wreck was easy, but I'll be damned if I can get it back on. I ended up butchering both the gasket and some of the paint behind the filler door. I have since abandoned that out of frustration.

In other news, my new leather interior from Alex is in in the front. Craig fixed (on a cold night in his garage I might add) my driver's seat, so it has the button it was missing, and so it has non-broken wiring on the heater loom. I certainly wouldn't have attempted this myself, so thanks Craig! Both fronts are now in and quite cushy, as is my new leather shift boot, although I'm sad to say goodbye to all the blueness of those other seats. I have yet to test the heated seat, but I'll be happy if it works.

As for the back leather seat, I had a nice one from Dale's old wagon, but was surprised to find it doesn't fit. Apparently the early 245's have different mounting brackets for the seat back...basically two pins, with one spring loaded. The bracket is enclosed (I'm assuming its a carryover from the 140), so the later 240 flared button ends of the pins can't slot in. What a drag. Also interesting is that the seat bottom on the later cars must be narrower, as the leather seat bottom has a good one inch gap on either side between the wheel-wells. Needless to say, it looks a bit silly, so at present, I only have black leather in the front.

I also took the weatherstripping and door sills from Alex's 244, to replace the early 140 style sills. Looks better, and with the addition of some hollow/rubber foam all the way around to better seal off the door, should be a lot quieter. Good times. Wintery warm goodness. And the short causing the seatbelt buzzer to stay on was caused by a loose wire under the e-brake console. Its all good now.

_________________
Image


Top
 Profile  
 
 Post subject:
PostPosted: Sat Feb 14, 2009 2:09 pm 
Whost Pore
User avatar

Joined: Tue May 06, 2008 6:54 pm
Posts: 579
Location: Brentwood
Did you condition those seats with some leather conditioner at all? cause I would really hate for them to crack on you.

_________________
__________________________________________
Alex

87 245, +t 517k
83 242t Project


Top
 Profile  
 
 Post subject:
PostPosted: Sat Feb 14, 2009 4:56 pm 
Haha, I just built a W24 Octo-Turbo, now what?!
User avatar

Joined: Thu Dec 29, 2005 12:29 am
Posts: 1790
Location: Eating tofu and legumes in my hippie shack
Yeah, I did a quick clean and condition on them right after I put them in. I'll probably do another one shortly.

_________________
Image


Top
 Profile  
 
 Post subject:
PostPosted: Sat Feb 14, 2009 5:22 pm 
Whost Pore
User avatar

Joined: Tue May 06, 2008 6:54 pm
Posts: 579
Location: Brentwood
Yeah man, I would do that for sure. Uncracked 30 year old leather is a beautiful thing...

_________________
__________________________________________
Alex

87 245, +t 517k
83 242t Project


Top
 Profile  
 
 Post subject:
PostPosted: Tue Feb 17, 2009 6:20 pm 
Haha, I just built a W24 Octo-Turbo, now what?!
User avatar

Joined: Thu Dec 29, 2005 12:29 am
Posts: 1790
Location: Eating tofu and legumes in my hippie shack
So, I'm thinking now I'm just gonna ditch my power steering on this car. With the skinny winter tires, and the fact that the car is on snow a lot of the time, I just don't need it. The rack is leaking a fair bit as well, so I can only see removing the power component helping that. That, and the road feel is an atrocity at present...where this steering is sending me I have no clue. It's kinda scary in winter. A bigger front sway is going on to help with that problem as well.

So my question then is, what is the best way to remove it? I've read all the threads on Turbobricks, and haven't really found a consistent answer. From what I understand: remove components and belt, and loop the one line on the feed back onto the return. The main confusion I have is how much fluid to remove from the rack: the best answer I read was to leave some fluid in there for lubrication, but not all of it.

Thoughts?

_________________
Image


Top
 Profile  
 
 Post subject:
PostPosted: Tue Feb 17, 2009 8:37 pm 
Haha, I just built a W24 Octo-Turbo, now what?!
User avatar

Joined: Wed Dec 21, 2005 8:40 pm
Posts: 3492
Location: Calgary, Ab
Personally I find this method to be really stiff. The way I'd do it is to not only remove the spool inside the pinion housing, but to remove the piston ring assembly on the rack shaft. A slight bit of fluid inside is all that's required - half full or so would be fine, provided you pull the piston rings. Otherwise you're forcing fluid and air through all the passages, which brings lots of resistance.


Top
 Profile  
 
 Post subject:
PostPosted: Tue Feb 17, 2009 9:20 pm 
Haha, I just built a W24 Octo-Turbo, now what?!
User avatar

Joined: Thu Dec 29, 2005 12:29 am
Posts: 1790
Location: Eating tofu and legumes in my hippie shack
Hmmm. Okay, cool. Thanks.
I'm not too familiar with the parts of the rack, but I'll see if I can find a diagram to help me decode some things. Hopefully its not too big a job.

_________________
Image


Top
 Profile  
 
 Post subject:
PostPosted: Tue Feb 17, 2009 9:41 pm 
Haha, I just built a W24 Octo-Turbo, now what?!
User avatar

Joined: Wed Jun 14, 2006 4:19 pm
Posts: 3131
Location: Lethbridge, AB
This doesn't sound like the best solution to me...if the rack is leaking like a sieve, why not fix the leak first, then loop the fluid? Otherwise your just driving a problem waiting for a place to happen.

_________________
Coburn Performance - OCD comes naturally.


Top
 Profile  
 
 Post subject:
PostPosted: Tue Feb 17, 2009 10:18 pm 
Haha, I just built a W24 Octo-Turbo, now what?!
User avatar

Joined: Thu Dec 29, 2005 12:29 am
Posts: 1790
Location: Eating tofu and legumes in my hippie shack
Because the major leak is at the top of the rack, where the steering shaft enters. If the rack isn't under pressure, and is half full of fluid, it won't leak out there anymore I'm guessing.

_________________
Image


Top
 Profile  
 
 Post subject:
PostPosted: Wed Feb 18, 2009 1:14 am 
I can fix the world
User avatar

Joined: Thu Dec 22, 2005 12:18 pm
Posts: 1461
Location: Calgary
What if you just remove the belt so that the pump isn't running? I did that on the old 240 and never had a problem.

_________________
2006 Subaru Sti


Top
 Profile  
 
Display posts from previous:  Sort by  
Post a new topicPost a reply Page 5 of 20   [ 289 posts ]
Go to page Previous  1, 2, 3, 4, 5, 6, 7, 8 ... 20  Next


Who is online

Users browsing this forum: No registered users and 17 guests


You cannot post new topics in this forum
You cannot reply to topics in this forum
You cannot edit your posts in this forum
You cannot delete your posts in this forum
You cannot post attachments in this forum

Jump to:  
cron


Powered by phpBB © 2000, 2002, 2005, 2007 phpBB Group
610nm Style by Daniel St. Jules of Gamexe.net