Change font size
It is currently Thu Apr 17, 2025 9:53 pm


Post a new topicPost a reply Page 1 of 2   [ 17 posts ]
Go to page 1, 2  Next
Author Message
 Post subject: Supercharged redblock v2
PostPosted: Wed Sep 30, 2009 10:12 pm 
Whost Pore

Joined: Sun Feb 11, 2007 7:26 pm
Posts: 558
Location: E-Town
since i started putting everything together the old way and started to VERY quickly run out of room i had to come up with something else...

this is it so far. i'm totally unsure of how to make sure it's straight to the face of the crank pulley though, any ideas how i could measure that?

Image
Image
Image
Image
Image
Image
Image
Image
Image
Image

After i friggered the clearances with the first iteration.


As well, you can see i'm learning to MIG

i realize the bead is high because i can't get enough current into the 1/4" thick angle iron to get good penetration, but any comments would be appreciated.


Top
 Profile  
 
 Post subject: Re: Supercharged redblock v2
PostPosted: Thu Oct 01, 2009 7:25 am 
Haha, I just built a W24 Octo-Turbo, now what?!
User avatar

Joined: Wed Dec 21, 2005 8:40 pm
Posts: 3492
Location: Calgary, Ab
Measuring squareness is pretty simple - you need a square surface (block) and a straightedge, and a little bit of measuring skill. That intake manifold is NOT square to the block, incidentally...

Your bracketry is going to need to be way stronger than what you've got, though! There will be several hundred pounds of force on the snout of that SC, and it'll tear everything apart if you mount it the way it looks like you're going. You might want to try a shorter M62 snout on there if you can - I believe it's shorter anyway, and I believe it'll fit, but that's just a guess - it'll put less torque on your mounts and will give you a bit more flexibility in where you position it.


Top
 Profile  
 
 Post subject: Re: Supercharged redblock v2
PostPosted: Thu Oct 01, 2009 9:37 am 
Whost Pore

Joined: Sun Feb 11, 2007 7:26 pm
Posts: 558
Location: E-Town
yeah, the way it's mounted right now is just to get it lined up/squared so that i can build the bracketry and beef it all up it's purely just a way to line it all up for the time being. AFAIK the m62 snout will not fit on these blowers, unfortunately, nor will the ford snout, which is shorter.

i'm thinking right now would be a good quality square off the block and then measuring each edge of the pulley and adjusting the bolt holes until it is square, but the problem i'm forseeing is the resolution of the measurements, in being that it would be easy to have a few degrees of misalignment that would knacker the whole setup by measuring to the edges of the pulley as they are rather narrow compared to the length of the blower.


Top
 Profile  
 
 Post subject: Re: Supercharged redblock v2
PostPosted: Thu Oct 01, 2009 5:18 pm 
I can fix the world
User avatar

Joined: Thu Dec 22, 2005 12:18 pm
Posts: 1461
Location: Calgary
The snout is sooo far out, seems like you would have some interference with the rad and everything

_________________
2006 Subaru Sti


Top
 Profile  
 
 Post subject: Re: Supercharged redblock v2
PostPosted: Thu Oct 01, 2009 5:55 pm 
Haha, I just built a W24 Octo-Turbo, now what?!
User avatar

Joined: Wed Jun 14, 2006 4:19 pm
Posts: 3131
Location: Lethbridge, AB
What everyone else has said with respect to the snout etc. The weld is a little high - but how's the penetration? If I was doing it, I would turn the heat down and go slower - this is how you control the bead shape and get good penetration. You can't force heat into the parent material (ie big heat, fast wire feed) if you only have light gauge stuff and small distances to cover. Remember, the weld puddle is like stirring a pot of metal - penetration results when there is a fusion between the filler and the parent material (it isn't glue).

When working with angle iron (of dubious composition usually) I would bevel the edges and give yourself some weld prep area. You'll still fill it with a single pass, but it will be a much better weld. Totally different technique to doing tube. And I'm with Matt - 1/8 wall angle iron isn't near strong enough - twice that would be fine. You can cut or drill holes in thicker plate to reduce weight (you know this of course).

Oh, and this is a wicked project. I've got an M60 and Laminova IC parts in the basement parts stash...nothing to run them on just yet.

_________________
Coburn Performance - OCD comes naturally.


Top
 Profile  
 
 Post subject: Re: Supercharged redblock v2
PostPosted: Thu Oct 01, 2009 6:35 pm 
Whost Pore

Joined: Sun Feb 11, 2007 7:26 pm
Posts: 558
Location: E-Town
heh, you guys gotta realize how far out the crank pulley sits in respect to the seal housing face, it'll look better when i mock up for a pulley.

got it jigged up straight to the block today, took a high quality square and a feeler gauge, so every level surface of the front of the block i stuck the square to with welding magnets, made sure it was perpendicular to the pulley and then used a feeler gauge to find the misalignment, now i can't even get the 0.001" one inbetween either on about 120º of pulley sweep on the blower so i SHOULD be good to go now! just gotta figure out how to make the strongest bracket I can. I'm a tad surprised just HOW far the whole blower tilted, i had to clearance the plate, and now it just touches the starter (will get cut back when it's time for bracketry)

Craig, i tried that and got even less penetration, i'm getting about 70% of the way through the two pieces when i cut it apart, so if i weld from each side it should be okay. still learning to dial in the wire speed though, never realized how easy it was to MIG, now just to refine the skills a bit more!

oh, and fyi, it's 1/4" x 3/4" wing angle. i'm going to try and figure out a plate that'll bolt to the accessory mount that i could cut with the torch and give some real strength to it some 3/8" solid plate had ought' to do the trick.


Top
 Profile  
 
 Post subject: Re: Supercharged redblock v2
PostPosted: Thu Oct 01, 2009 8:11 pm 
Haha, I just built a W24 Octo-Turbo, now what?!
User avatar

Joined: Wed Jun 14, 2006 4:19 pm
Posts: 3131
Location: Lethbridge, AB
Go slower...it's a feel thing, so once you've done it, you'll never forget. Remember a weld that is going well sounds like frying bacon. I think you're moving to fast...how well can you see the weld puddle? What helmet are you using - for general MIG work, I use a #9 shade so I can see well. Also, get in a comfortable seated position and you'll be fine.

_________________
Coburn Performance - OCD comes naturally.


Top
 Profile  
 
 Post subject: Re: Supercharged redblock v2
PostPosted: Thu Oct 01, 2009 8:36 pm 
Whost Pore

Joined: Sun Feb 11, 2007 7:26 pm
Posts: 558
Location: E-Town
i've been using an 11, and you're right, i've been having trouble seeing the puddle. i turned down the wire speed a bit and closed up the gap and had the one weld i did tonight go well (as well as using a little bit wider zig-zag pattern)

i'm probably going to try bevelling the edges here.

as far as the strength thing goes, i'm going to brace each corner with a 1/8" x 2" piece of flat stock between the corners of the angle iron, i just ran some rough calculations and the maximum load at some points on the bracket could exceed 600lbs in tension and 450lbs or so in compression :S


Top
 Profile  
 
 Post subject: Re: Supercharged redblock v2
PostPosted: Fri Oct 02, 2009 8:06 am 
Haha, I just built a W24 Octo-Turbo, now what?!
User avatar

Joined: Wed Jun 14, 2006 4:19 pm
Posts: 3131
Location: Lethbridge, AB
rockmonton wrote:
i've been using an 11, and you're right, i've been having trouble seeing the puddle. i turned down the wire speed a bit and closed up the gap and had the one weld i did tonight go well (as well as using a little bit wider zig-zag pattern)

i'm probably going to try bevelling the edges here.

as far as the strength thing goes, i'm going to brace each corner with a 1/8" x 2" piece of flat stock between the corners of the angle iron, i just ran some rough calculations and the maximum load at some points on the bracket could exceed 600lbs in tension and 450lbs or so in compression :S


No zig-zag, that just gets rid of the heat. The only time I stitch is when I'm either welding vertically or if I've got to lay in a fillet on a T joint. I wouldn't weave on a little butt joint like that.

_________________
Coburn Performance - OCD comes naturally.


Top
 Profile  
 
 Post subject: Re: Supercharged redblock v2
PostPosted: Fri Oct 02, 2009 5:00 pm 
Whost Pore

Joined: Sun Feb 11, 2007 7:26 pm
Posts: 558
Location: E-Town
tried a temp setting down and about half the wire feed, a lot cleaner, tinier bead, but not nearly as good of penetration, turned it back up to max, tried some bevel and took it nice and slow, cut the wire speed a bit and moved closer and it seems to be laying a lot flatter with visible penetration on the other side. still the bead is a bit wobbly and uneven, but i think that'll come with practise. now, for mounting points on this blower...

so far i'll be using the 5 holes for the stock accessory bracket, the two random holes off the block nearish the starter, the and the cover of the oil pump drive. however, there are two holes up high right under the deck on the b230 in the middle of the head area that aren't on the b21 motors.... can anyone tell me if these are on all b230's/b23/what?


Top
 Profile  
 
 Post subject: Re: Supercharged redblock v2
PostPosted: Fri Oct 02, 2009 10:48 pm 
Whost Pore

Joined: Sun Feb 11, 2007 7:26 pm
Posts: 558
Location: E-Town
just a few more pics for those who voiced concern over the snouth length/location...

Image
Image
Image
Image


Top
 Profile  
 
 Post subject: Re: Supercharged redblock v2
PostPosted: Sat Oct 03, 2009 9:11 am 
Haha, I just built a W24 Octo-Turbo, now what?!
User avatar

Joined: Wed Jun 14, 2006 4:19 pm
Posts: 3131
Location: Lethbridge, AB
rockmonton wrote:
Image


Ok, one last welding tip, then I'm going to shut-up and let you get on with it. I'm hoping you're not using flux core on this...right? I would lay some nice filets (welds not fish) in on the backsides of the brackets. Looking at the picture, I'm afraid your welds may be cold - I don't see a head affected zone on the back side of the angle iron that is facing the front of the engine. You should see a discolouration of the mill scale when you've welded this sort of thing.

So, using the same technique, weld up a coupon out of some scrap and cut it apart across the weld. Evaluate not only the depth of penetration but the quality of the weld in general. It will be pretty obvious if the weld is just sitting on the surface or is married to the parent material.

One last little thing...when working with angle iron or any other steel - especially hot rolled anything, it is vital to get the mill scale OFF of the weld area. Grind until you have shiny steel all around the weld area to about 1 cm away from the weld joint. No need to introduce odd metallurgy into the weld process - there's enough of that going on anyway.

I noticed that you hadn't done this on the back side of the bracket. Sure it's magnetic and will produce an arc...but if this thing comes apart under load, it may not be pretty - and it may be just fine forever. If you clean it off and check your weld carefully, "just fine forever" has a much higher probability.

_________________
Coburn Performance - OCD comes naturally.


Top
 Profile  
 
 Post subject: Re: Supercharged redblock v2
PostPosted: Sat Oct 03, 2009 10:42 am 
Whost Pore

Joined: Sun Feb 11, 2007 7:26 pm
Posts: 558
Location: E-Town
yeah, you're right, i'm not getting nearly enough heat into this thing with the little mig. I am using shielded wire, but am still figuring out this whole thing.

It's about this point i'm considering finishing the 220v wiring in the garage and hooking up this old beastly transformer type stick welder to get'er done.

I'll weld up a coupon and cut it apart for you guys today to get some more critique and see if i need more power.


Top
 Profile  
 
 Post subject: Re: Supercharged redblock v2
PostPosted: Sat Oct 03, 2009 12:09 pm 
Whost Pore

Joined: Sun Feb 11, 2007 7:26 pm
Posts: 558
Location: E-Town
here's a quick one, cut just off the centreline of the angle iron, single very slight bevel, one pass.

normally i've got a bevel and a pass on each side...

as you can see i'm only about 40% of the way in in the thickest part, so maybe a wider bevel in that area?


and pardon my ignorance, but i'm not familiar with what a "fish" weld is...

can you enlighten me?


Image
Image
Image
Image
Image
Image
Image
Image
Image

Regardless, i think with a pass on each side and a bit healtheir bevel i can get some welds that i'd be happy with out of this.


Top
 Profile  
 
 Post subject: Re: Supercharged redblock v2
PostPosted: Sat Oct 03, 2009 6:22 pm 
Haha, I just built a W24 Octo-Turbo, now what?!
User avatar

Joined: Wed Jun 14, 2006 4:19 pm
Posts: 3131
Location: Lethbridge, AB
Eric,

Those are COLD as hell. I dashed out the the garage and did up a coupon for you so you can see what I'm talking about (between periods of the hockey game - now that's dedication). Let's review - I'm working with a 120V Deca 135A machine - 8 out of 10 for wire speed, High 2 heat and 0.035" wire with Blue Shield gas.

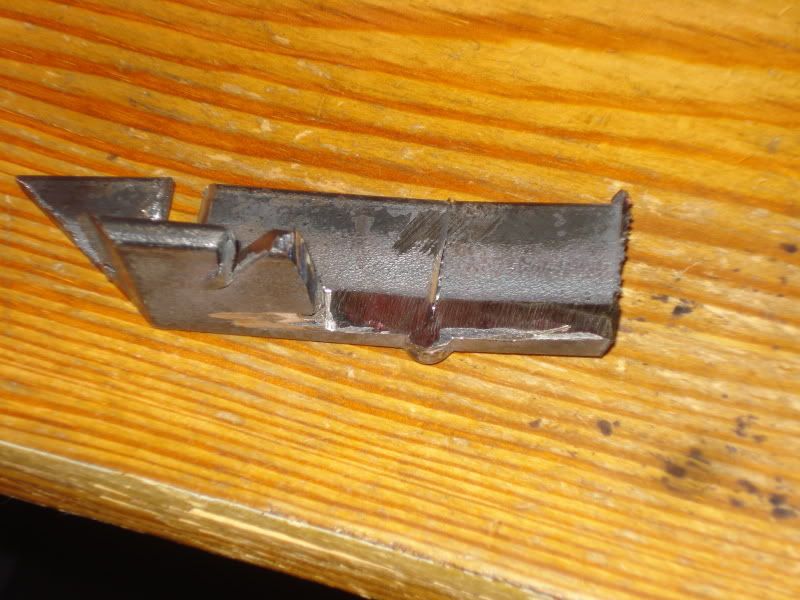
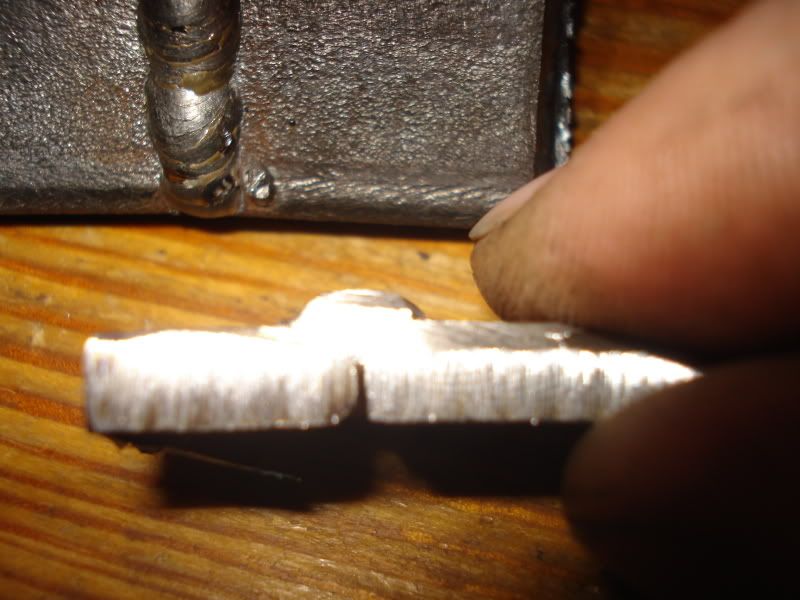
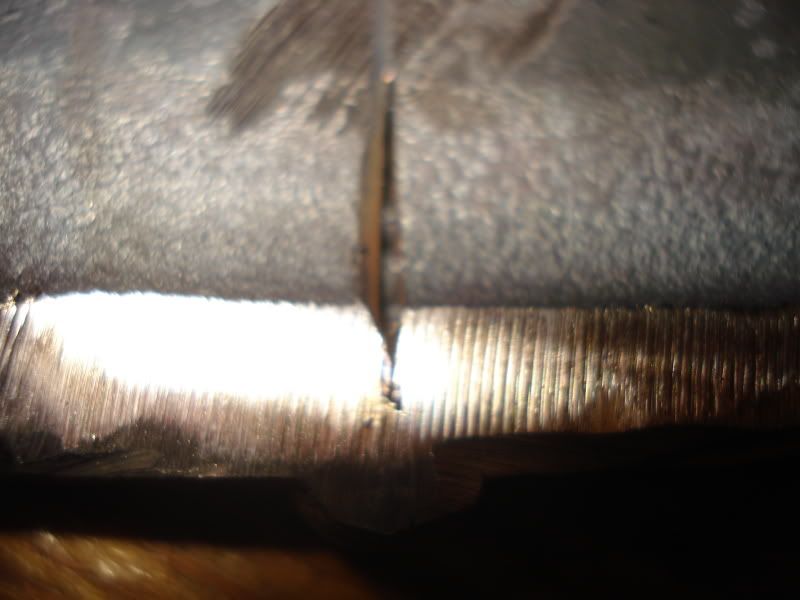
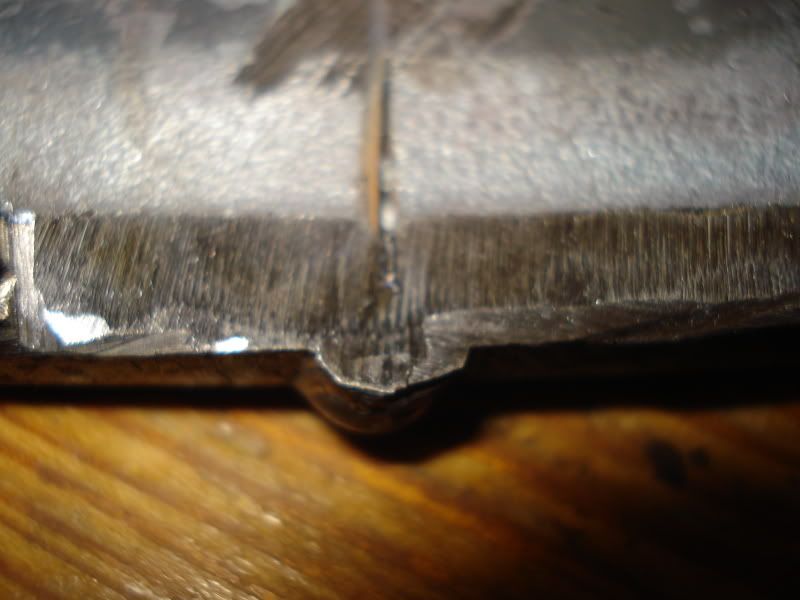
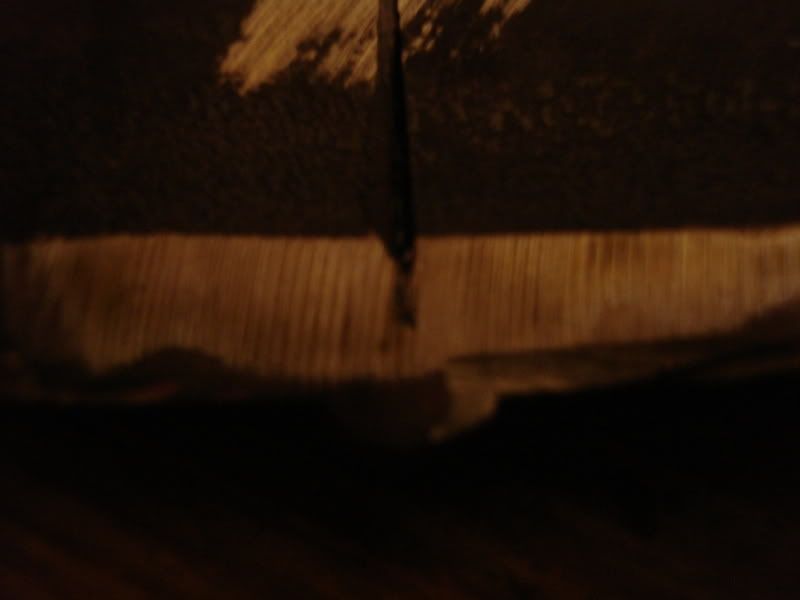
These are on 3/8 plate steel.
Top of the bead
Image

Back - showing no full penetration, more on this later.
Image

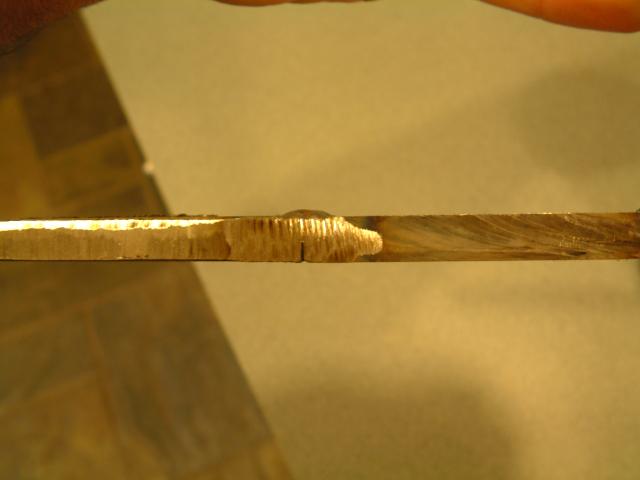
Start - note that the penetration is shallow as there is no heat in the metal when you start welding. I'm still 1/2 way through. Also note there is no way to see where my weld starts and the metal begins - these are fused.
Image

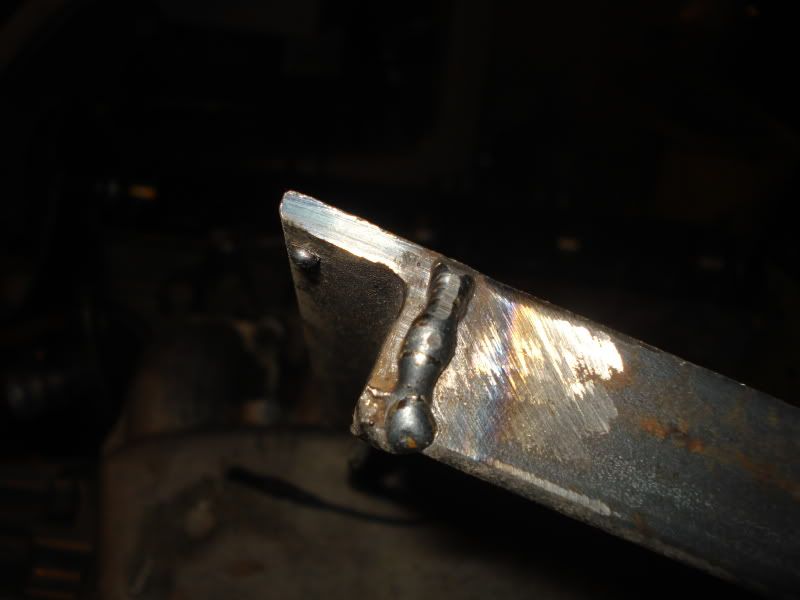
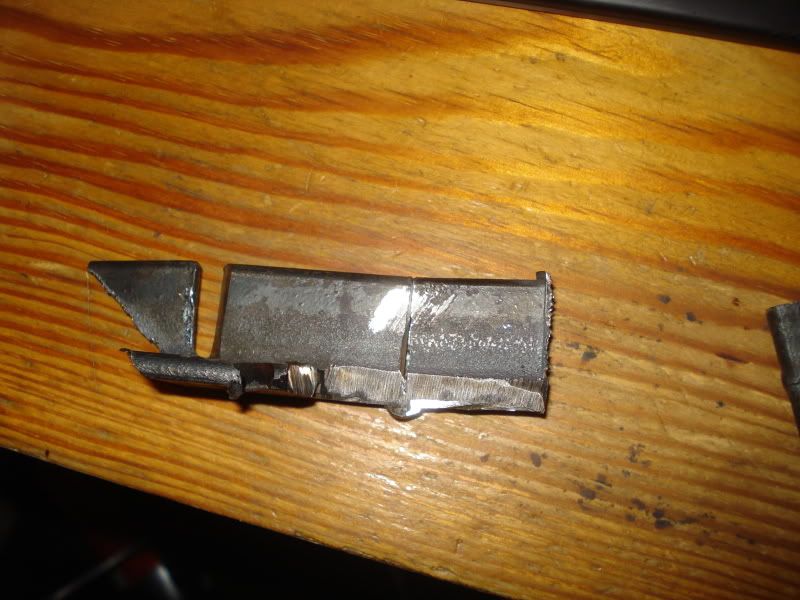
This is the end of the pass...not quite 100% but 99.9 will do for this weld. No way to tell where the bead is, also note the bead shape - flat without excess wire.
Image

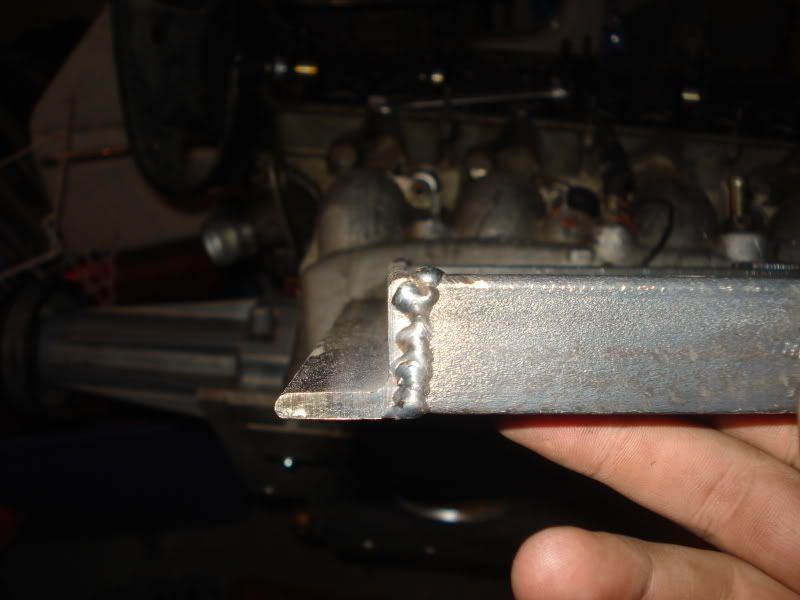
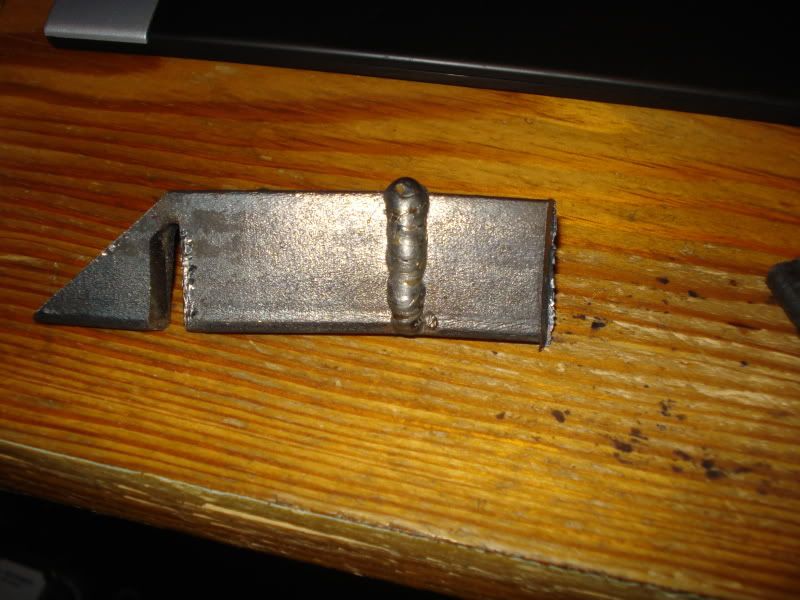
This is a fillet weld. You have to weave to get this shape - the idea is to fill the corner.
Image

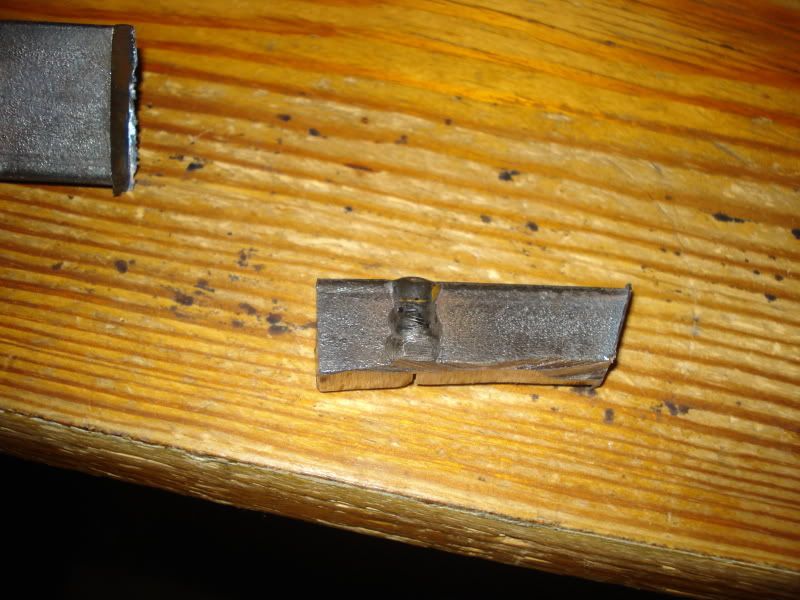
Cross section. Note the consistency of the weld as you look along it's length.
Image

Heat affected zone - easy to see on the fillet, harder to see through the rust on the butt weld.
Image

Make them look like this and you're golden.

_________________
Coburn Performance - OCD comes naturally.


Top
 Profile  
 
Display posts from previous:  Sort by  
Post a new topicPost a reply Page 1 of 2   [ 17 posts ]
Go to page 1, 2  Next


Who is online

Users browsing this forum: Google [Bot] and 13 guests


You cannot post new topics in this forum
You cannot reply to topics in this forum
You cannot edit your posts in this forum
You cannot delete your posts in this forum
You cannot post attachments in this forum

Jump to:  
cron


Powered by phpBB © 2000, 2002, 2005, 2007 phpBB Group
610nm Style by Daniel St. Jules of Gamexe.net