Change font size
It is currently Sat Jan 18, 2025 10:26 am


Post a new topicPost a reply Page 1 of 1   [ 14 posts ]
Author Message
 Post subject: Project make rocketship look more better.
PostPosted: Wed Jun 13, 2007 1:46 pm 
Haha, I just built a W24 Octo-Turbo, now what?!
User avatar

Joined: Thu Dec 29, 2005 12:29 am
Posts: 1790
Location: Eating tofu and legumes in my hippie shack
Right.
As some of you know, my +T project is now up and running successfully, and now its time to get the car looking a little better. Craig has generously offered a great deal of his time and energy, and is helping me fix a bunch of my rust spots, with the intention of respraying the bottom half of the car once its all fixed. I'm pretty stoked for this, and I figured I'd post progress up here.

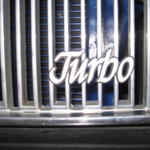
First up...my refinished grille. Got this one off Dale, with the intention of using it once I remove the crappy looking flathood off the wagon. I sanded it down, did some filling, changed the badge, and repainted the chrome black.
Image

Next up, the problem.
Image
Image
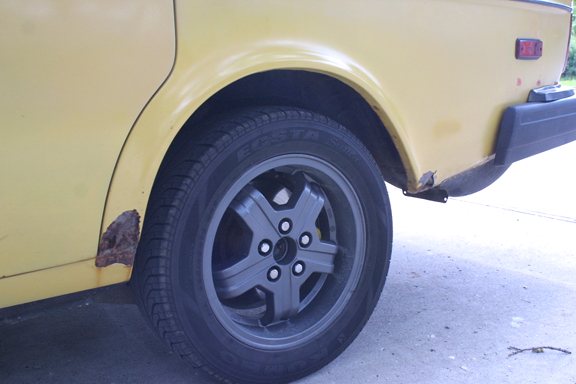
While the left side looks worse than the right, both sides have rot in front of the rear wheelwell, and on the bottom of the rear quarter panels. The right side has a bit more rot inside the wheelwell which will be fixed. The majority of the rust on the car is in these spots. They've been fixed with bondo before, but kept coming back. Time for sheet metal. The rest of the rust is mostly surface. Not bad for a car with nearly 500 k.

Next up, we built a template for the wheelwell bits, cut some 22 ga sheetmetal, and then bent it up. Craig made this block in the shape of the patch to help the bends form.
Image
And then he used it to hammer the pieces into shape. (Craig may want to correct my terminology...I'm new to this) Craig's mad skilz at work here. The multiple bends with the lip is a little crazy...not something I'd attempt on my own.
Image
Here's a look at the right patch against the original panel.
Image
It still needs to bend top to bottom, but this will be done against the car in place.

Next up was the template for the rear quarters. Its a beauty. Art school skills coming in handy here....
Image

The panels got cut, and Craig used a bench mounted brake to make the long bend, creating the one inch wide bit at the bottom.
Image
Image
The slight bend of the panel was made by hand against a 3 inch pipe.

Image

The final bend against the fender lip will be made against the actual panel on the car.

Next up, cutting out the rusty bits, and welding in the new stuff. More to come. :D

_________________
Image


Top
 Profile  
 
 Post subject: Metal Shaping Madness
PostPosted: Wed Jun 13, 2007 4:17 pm 
Haha, I just built a W24 Octo-Turbo, now what?!
User avatar

Joined: Wed Jun 14, 2006 4:19 pm
Posts: 3131
Location: Lethbridge, AB
The form that I created is called a hammer form and is used to sandwich the metal for rolling the edge and creating curves without puckers (shrinking the sides of the fender). Wood is used with a soft faced (urethane) hammer to allow shrinking (metal hammer and dolly = stretching).

So far the best part (aside from hanging with Greg in my dirty garage) is the vicious tool in the background of the pattern picture. It's a Princess Auto 14ga metal shear. You'll toss all your tin snips after using this thing (currently on sale for $48...which is why I've got one). Damn thing goes through 22ga like butter (once the jaws are set...sometimes they don't get the clearances correct in the factory in China - damn 12 year olds). It is pretty scary the first time you use it, but I'll never cut sheet metal without it again.

This weekend - "Project Hack Greg's Car to Bits" begins.

Craig


Top
 Profile  
 
 Post subject:
PostPosted: Wed Jun 20, 2007 11:15 am 
Haha, I just built a W24 Octo-Turbo, now what?!
User avatar

Joined: Thu Dec 29, 2005 12:29 am
Posts: 1790
Location: Eating tofu and legumes in my hippie shack
More progress.
Here's a good view of the right rear rust, with the cutting beginning.
Image
After the first cuts, with sound deadening removed as prep for welding.
Image
First inside patch panel in place, with a bend meeting at the seam. Craig's welding skilz at work here.
Image
Outside view.
Image
More cutting, with Craig working underneath.
Image
Next patch going on.
Image
2nd patch and support piece along the seam.
Image
Outside taking shape.
Image

More to come!

_________________
Image


Top
 Profile  
 
 Post subject:
PostPosted: Thu Jun 21, 2007 8:08 pm 
Haha, I just built a W24 Octo-Turbo, now what?!
User avatar

Joined: Wed Dec 21, 2005 8:34 pm
Posts: 1834
Location: It varies...
sweet...i like verr much

i have to do some work like this as well for the GT but it wont look as pretty that's forsure, i plan to cut out the rusty area's etc. and make it pretty much flat and such

all angles and mean stealth bomber looking...lol

wicked job though!

ciao

_________________
VOLVO - not just a car, it's an addiction.
Image


Top
 Profile  
 
 Post subject:
PostPosted: Mon Jul 02, 2007 12:25 pm 
Haha, I just built a W24 Octo-Turbo, now what?!
User avatar

Joined: Thu Dec 29, 2005 12:29 am
Posts: 1790
Location: Eating tofu and legumes in my hippie shack
Right rear quarter was finished last week.
Here's a look at the outside welds, with the final panel in place.
Image
After a bit o' filler and primer.
Image
POR 15 on the inside.
Image

_________________
Image


Top
 Profile  
 
 Post subject:
PostPosted: Mon Jul 02, 2007 12:54 pm 
Haha, I just built a W24 Octo-Turbo, now what?!
User avatar

Joined: Thu Dec 29, 2005 12:29 am
Posts: 1790
Location: Eating tofu and legumes in my hippie shack
And here's yesterday's progress!
Craig and I started on the right wheelwell. First up was cutting out the metal to inspect the damage.
Image
The first layer was cut away, to reveal two small holes on the inner fender. Noting where the drainage hole was, and where the third layer of metal meets the second, it became obvious why the thing rusted where it did. The rust wasn't that bad though (three layers of thick sheet in some places!) and most of the metal was intact. Craig cut out some patches and welded 'em on, the first was bent along the inner well itself, and the second was smaller in the front.
Image
This all got painted to seal it up before the final shaped front patch panel was welded into place. It was cut to butt up against existing metal, and holes inserted to spot on the inner well.
Craigs mad welding skills at work here again. This is right after welding and a bit of grinding.
Image
Spotted welds on the inside.
Image
And finally, the primed end piece.
Image
I'm pretty stoked, as the piece went in so well, and looks incredible. Very little filler was needed....all metal up front, and the welds were amazing. Thanks Craig!

More on the driver's side to come.

_________________
Image


Top
 Profile  
 
 Post subject:
PostPosted: Mon Jul 02, 2007 11:16 pm 
Strapping on extra booster rockets

Joined: Thu Dec 22, 2005 3:21 am
Posts: 311
wow, insanely good work, i will one day have to do this to the GT, im having rust issues in similar areas, i can't wait to see the finished product!


Top
 Profile  
 
 Post subject:
PostPosted: Mon Jul 02, 2007 11:43 pm 
747 Jet engine being stuffed into trunk
User avatar

Joined: Mon Jan 23, 2006 6:06 pm
Posts: 796
Location: Cochrane, AB
You can do that with the roof? :mrgreen:


Top
 Profile  
 
 Post subject:
PostPosted: Tue Jul 03, 2007 11:25 am 
Haha, I just built a W24 Octo-Turbo, now what?!
User avatar

Joined: Thu Dec 29, 2005 12:29 am
Posts: 1790
Location: Eating tofu and legumes in my hippie shack
Thanks J-Hop! I really can't take much credit, as Craig deserves that.

As for the roof? Uhhhh......

_________________
Image


Top
 Profile  
 
 Post subject:
PostPosted: Tue Jul 03, 2007 10:54 pm 
Haha, I just built a W24 Octo-Turbo, now what?!
User avatar

Joined: Wed Dec 21, 2005 8:34 pm
Posts: 1834
Location: It varies...
man that rocks

wow!

ciao

_________________
VOLVO - not just a car, it's an addiction.
Image


Top
 Profile  
 
 Post subject: Butt Welds Make Me Nervous
PostPosted: Wed Jul 04, 2007 8:33 am 
Haha, I just built a W24 Octo-Turbo, now what?!
User avatar

Joined: Wed Jun 14, 2006 4:19 pm
Posts: 3131
Location: Lethbridge, AB
[quote]volvoshredder Posted: Tue Jul 03, 2007 10:25 am Post subject:

--------------------------------------------------------------------------------

Thanks J-Hop! I really can't take much credit, as Craig deserves that.

As for the roof? Uhhhh...... [\quote]


That front edge was very tricky...had the squirt bottle out cooling things the entire time.

I'm sure the roof comment refers to a leaky hole in the top of someone's car - No?


Top
 Profile  
 
 Post subject:
PostPosted: Wed Jul 04, 2007 10:24 am 
Haha, I just built a W24 Octo-Turbo, now what?!
User avatar

Joined: Thu Dec 29, 2005 12:29 am
Posts: 1790
Location: Eating tofu and legumes in my hippie shack
Yeah, I think Steph has some rust on his roof.

_________________
Image


Top
 Profile  
 
 Post subject:
PostPosted: Wed Jul 04, 2007 7:11 pm 
747 Jet engine being stuffed into trunk
User avatar

Joined: Mon Jan 23, 2006 6:06 pm
Posts: 796
Location: Cochrane, AB
Nothing major, but it's not a easy location to fix (well, we tried to fix it and came back quickly) and I wouldn't like it if rust make its way inside the roof. :x

Image


Top
 Profile  
 
 Post subject: Rusty Roof
PostPosted: Fri Jul 06, 2007 9:32 am 
Haha, I just built a W24 Octo-Turbo, now what?!
User avatar

Joined: Wed Jun 14, 2006 4:19 pm
Posts: 3131
Location: Lethbridge, AB
That is a nasty place to get rust...but with a little hammer forming, you could fabricate a panel and weld it in and be good to go for another 20 years.

Craig


Top
 Profile  
 
Display posts from previous:  Sort by  
Post a new topicPost a reply Page 1 of 1   [ 14 posts ]


Who is online

Users browsing this forum: No registered users and 3 guests


You cannot post new topics in this forum
You cannot reply to topics in this forum
You cannot edit your posts in this forum
You cannot delete your posts in this forum
You cannot post attachments in this forum

Jump to:  
cron


Powered by phpBB © 2000, 2002, 2005, 2007 phpBB Group
610nm Style by Daniel St. Jules of Gamexe.net