Change font size
It is currently Thu Jun 27, 2024 3:18 pm


Post a new topicPost a reply Page 12 of 22   [ 322 posts ]
Go to page Previous  1 ... 9, 10, 11, 12, 13, 14, 15 ... 22  Next
Author Message
 Post subject: Re: Project Bertone
PostPosted: Wed Jan 05, 2011 9:05 am 
Haha, I just built a W24 Octo-Turbo, now what?!
User avatar

Joined: Wed Dec 21, 2005 8:40 pm
Posts: 3492
Location: Calgary, Ab
I've copied the thread into the Car Stuff discussion area and deleted lots of posts. We'll keep chit-chatting in this thread, and I'll cross-post all the new relevant information into both. 'kay?


Top
 Profile  
 
 Post subject: Re: Project Bertone
PostPosted: Tue Jan 25, 2011 5:49 am 
Haha, I just built a W24 Octo-Turbo, now what?!
User avatar

Joined: Wed Dec 21, 2005 8:40 pm
Posts: 3492
Location: Calgary, Ab
Been a long couple of weeks, haven't gotten much done on the car but have been busy otherwise. I've done snippets of work, much isn't worth showing but spent some time cleaning, scrubbing, and cleaning again. I wasn't worried about getting all the stains out, but focused on getting most of the crud off things.

This weekend I finally got some assembly done:

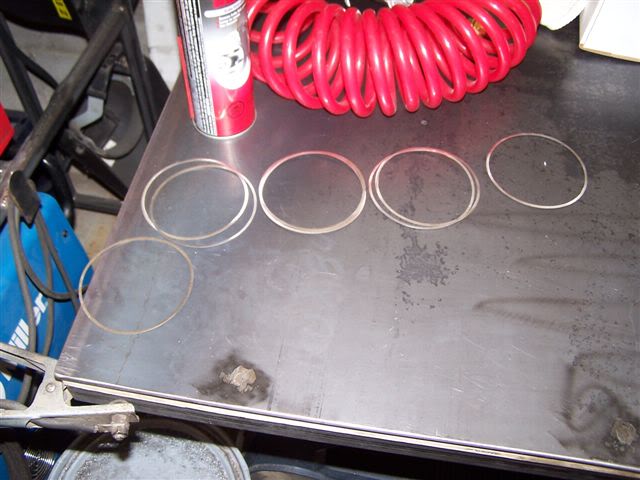
I had some cylinder shims made up. These were cut for me by Laser Equations, as I couldn't get any from Volvo and even then I couldn't get them thick enough. The cylinders are supposed to be shimmed .006-.008" out of the block, and Volvo sells (sold) shims in the range of .003-.006". My cylinders were all .002-.003" down in the block, and nobody talks about stacking shims so I assumed it was not to be done,and I had these cut out of .011" shim stock. I mic'd them and arranged them by average thickness, applied the thinnest to the one cylinder .002" down and the thickest to the cylinder on the deep side of .003" down. Two were spares. They ended up being cheaper than buying a dozen from Volvo that I was going to stack, were they available.
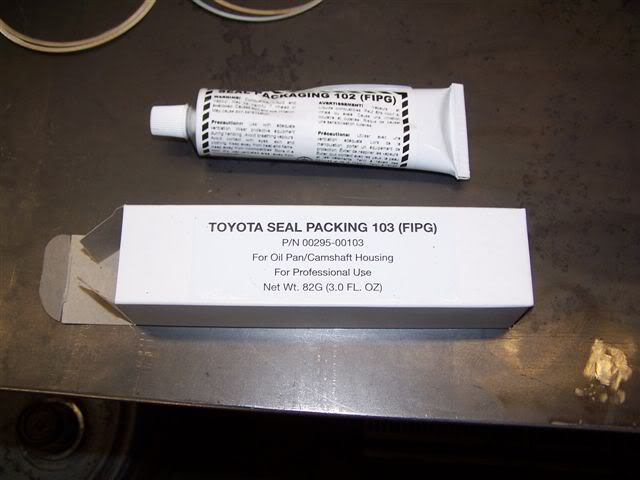
Image

To seal them:
Image

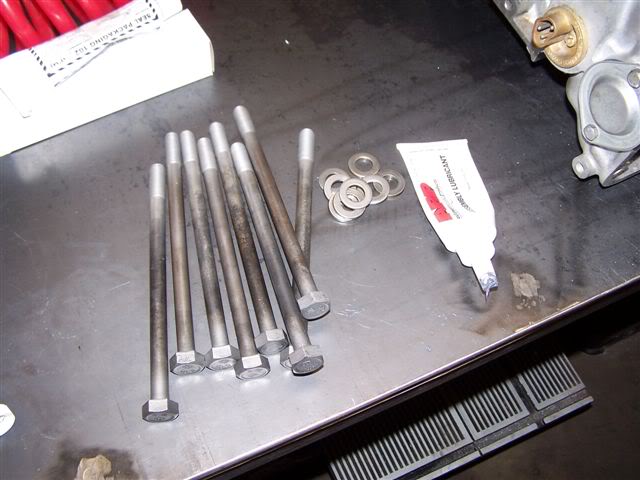
Clean head bolts and washers, plus some leftover thread lube from the evil V8-244 project.
Image

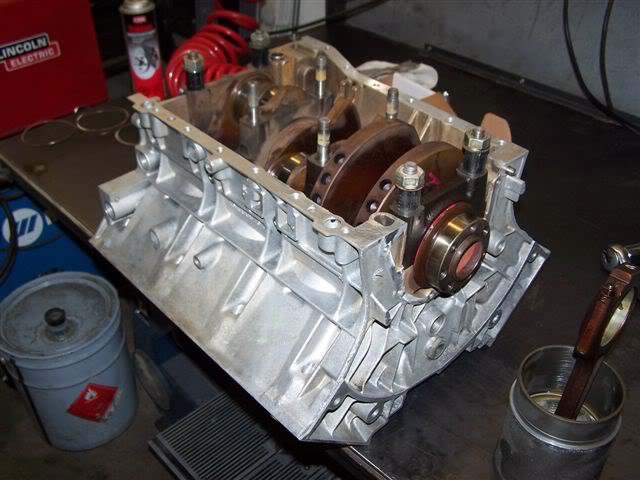
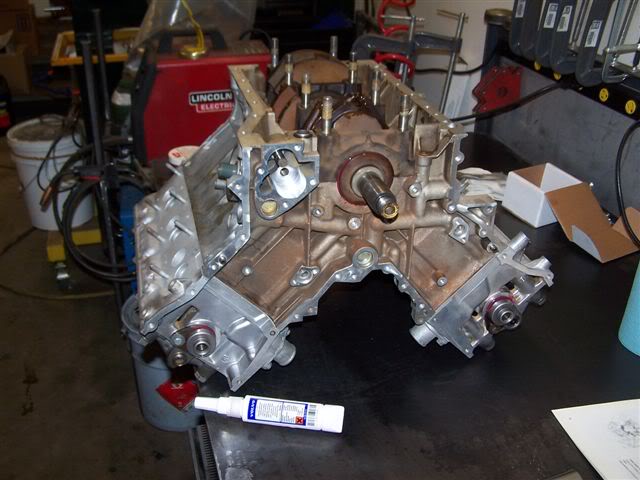
Order of assembly, step #1: install crankshaft. As the studs are long enough to go through the main caps and the cradle, and as the studs aren't threaded far enough to bolt the caps directly to the block, one is instructed to use 4 spacers to bolt down #1 and #4 main caps, while using the cross-bolts to hold #2 &#3 caps.
Image

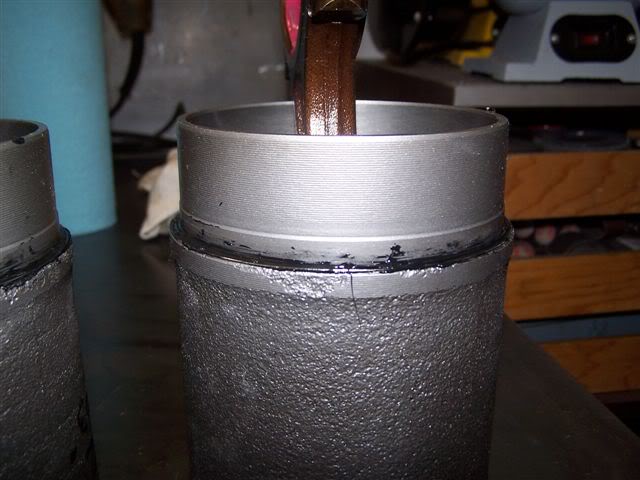
Step #2: prepare cylinders. I deviated quite a bit in the assembly procedures here. The factory says to install the cylinders, using cylinder hold-downs to keep them in place, then to install the pistons/rings in a conventional manner. I pre-assembled the pistons/rings into the cylinders and set them aside, marking the location of the major thrust axis (and therefore the ring gaps, another deviation of mine). I then laid a bead of sealant, installed a shim, added a second bead of sealant, and smeared assembly lube on the bearings.
Image

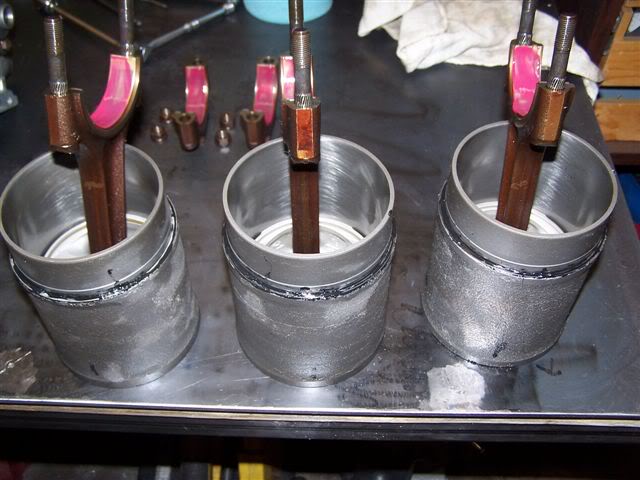
A close up to show the source of a heart attack to come later.
Image

One side done. Hurry before the sealant hardens!
Image

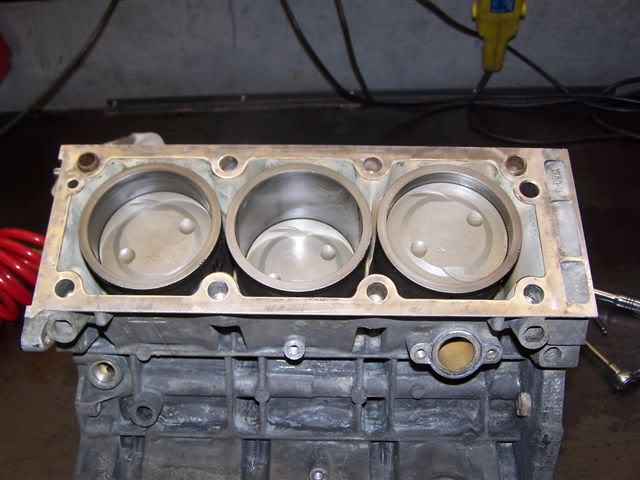
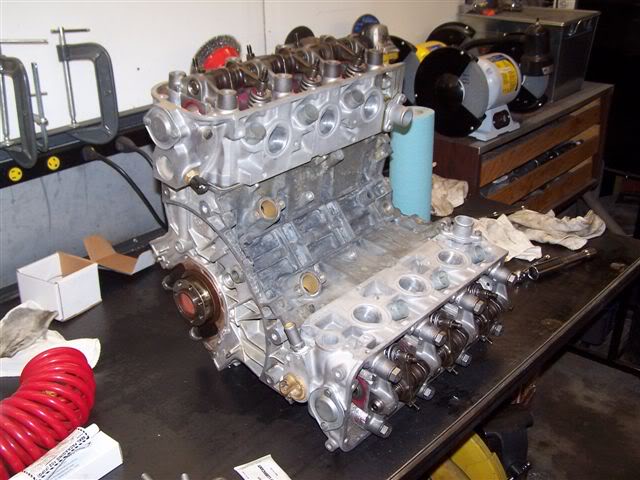
Head on and torqued to the first stage, to squish out the sealant and seat the cylinders in the block. Another reason for my deviation to the assembly steps was because I wasn't sure what sealants (if any) were on the factory shims, but I knew I would be using the Toyota goop so I would want to seat the cylinders into the block evenly and with authority, and using the head was the best way I could think to do this.
Image

Repeat steps for second bank:
Image

Oil and torque rod bolts to spec, and bust out more expensive chemical gasket:
Image

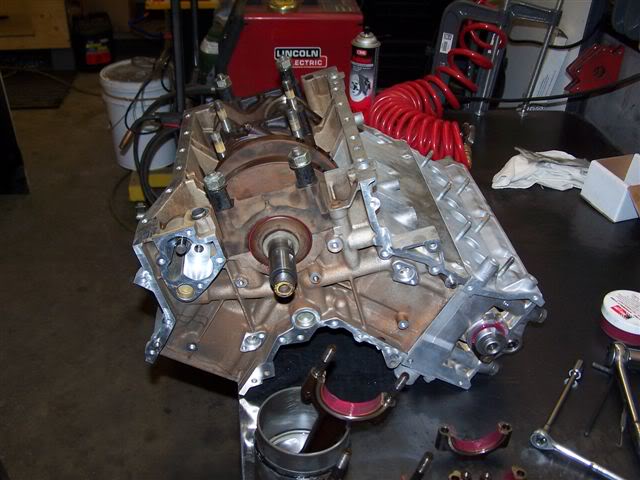
Smear the delightfully pink Volvo goop all over everything (block rails and rod caps). Don't forget the oil pump O-ring (I didn't):
Image

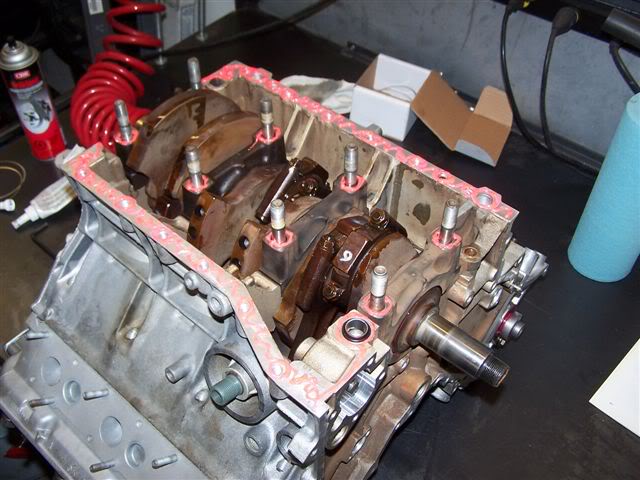
Don't forget the rear main housing (I did, at first) and assemble. Use more sealant on the "outside" 4 main bolt washers and torque to spec, and bolt up the perimeter bolts, locking the cradle to the block.
Image

It is at this point that I realized something important: I hadn't been overly careful seating the thrust bearing and making sure the rear thrust surfaces were flush. I'm not pulling anything apart now - I will live with it. It's not a racing engine, and it's only got a torque converter pushing forward on the crank. It'll be fine.

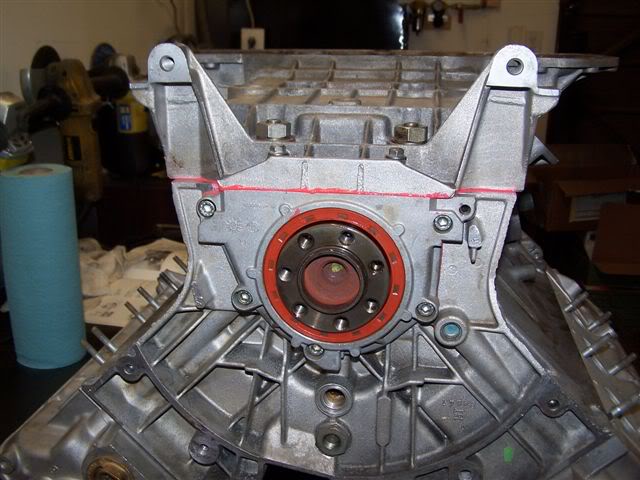
Now for my heart attack: After it was all buttoned up and I flipped the block over, to install the oil galley threaded plugs & give things the once-over, I had a bit of a scare. Directly above the rear two (#1 and #4) cylinders there are large holes into the water jacket, and through one of these holes I saw what appeared to be a hairline crack. Even with a flashlight and my calibrated eye I was convinced it was a crack. While I was gooping up the shims the connecting rod shifted and once I half-dropped a cylinder assembly, bouncing it off the steel table. A couple other times the rod dinked off the cylinder while shifting things around. Could I have cracked the cylinder while doing this? Was the crack there and I missed it while blasting/cleaning/examining, and it only shows up when the head is torqued on? Was this why compression was leaking into the cooling system? Will I be installing the redblock after all?

Then I reached in with a pick and scraped the little stringer of sealant goop off. :lol:


Top
 Profile  
 
 Post subject: Re: Project Bertone
PostPosted: Tue Jan 25, 2011 9:35 am 
Haha, I just built a W24 Octo-Turbo, now what?!
User avatar

Joined: Wed Jun 14, 2006 4:19 pm
Posts: 3131
Location: Lethbridge, AB
You mean to tell me you didn't platigauge the crank and measure the end float before putting it all back together? Looks good otherwise - goop as cracks...feel with fingernail first! So you're happy with it and ready to do the install?

_________________
Coburn Performance - OCD comes naturally.


Top
 Profile  
 
 Post subject: Re: Project Bertone
PostPosted: Tue Jan 25, 2011 10:26 am 
Haha, I just built a W24 Octo-Turbo, now what?!
User avatar

Joined: Wed Dec 21, 2005 8:40 pm
Posts: 3492
Location: Calgary, Ab
Nope! The crank endfloat passed the visual inspection, the thrust bearings and bearing surfaces looked great, and plastigauge would only have told me if the crank needed grinding or of the bearings needed replacing, neither of which I was about to do. Checking things only does you any good if you intend to do something about fixing it if it's out of spec, right? The assembly order of this engine put me off my game with regard to setting the thrust bearing, which I'm usually much more meticulous about. The crank still has endfloat and I'm not gonna worry about it. With an automatic, it doesn't put huge thrust loads on the crank anyway. If it were anyone else's engine I might be more concerned with it, but based on the general "clean, reassemble, and run it" vibe I've got going on, I'm okay with it.

Regarding the goop, I couldn't get my finger down there to feel anything, and it was just a hairline of goop so I'm not sure if I would have believed it was anything but a crack until I scraped it off. It was visual inspection only, and I couldn't even get at all of the goop with a dental pick. Even then, I wasn't sure if I was scraping goop or just peening the crack with the scraper. Get a nasty idea in your head and it's tough to get it out.

Yeah, I'm getting there. The next step is to get it on a stand, mask & paint, and degree the cams. I should torque the heads first. Lots to do, and running out of time. Might not be able to get at the paint this winter!


Top
 Profile  
 
 Post subject: Re: Project Bertone
PostPosted: Tue Jan 25, 2011 10:46 am 
Haha, I just built a W24 Octo-Turbo, now what?!
User avatar

Joined: Wed Dec 21, 2005 7:14 pm
Posts: 1875
Location: Missing my garage in Sunnyside
What's the deck height ending up at, out of curiousity?

Looks good Matt- I really hope this thing goes right for you off the start, unlike that other non-redblock project of yours a few years back.

_________________
Hi, I drive a fictional star wars character with rear wheel drive. His name is Darth Wagon, he has a shiny helmet.
Image


Top
 Profile  
 
 Post subject: Re: Project Bertone
PostPosted: Tue Jan 25, 2011 11:40 am 
Haha, I just built a W24 Octo-Turbo, now what?!
User avatar

Joined: Wed Dec 21, 2005 8:40 pm
Posts: 3492
Location: Calgary, Ab
Hell if I know, Athal. I would need to have gotten to this point in the assembly and then pulled the head to find out, due to the compressibility of the black goop and the speed at which I needed to assemble things. I could have pre-measured, but I'm sure it would be slightly different now with a thin strip of goop on either side of the shim. There's a chance that I will pull one head to get a dead-nuts accurate TDC, and if I do I will measure it for our information.

I will say again that it won't matter. There are no quench pads on the head, the combustion chamber is conical so there would be a very thin band of effective quench with this piston, the combustion chamber "roof" is .020" recessed into the head deck surface, and the head gasket is about the same as the Elring of .047". I don't think the pistons project out of the bores, so at best we're looking at about .070" from the corner of the piston to the nearest point on the head. Even if the corner of the piston tagged the head, the effective quench band would only be about .080" wide.

At the very least, one of the things that I have going for me on this one are that all the parts have worked together for the previous 200,000 miles. There are no custom bits here, no questionable machining, and the quality of the parts is 5x better than the Ford stuff. It won't be a new engine and might leak a bit of compression past used rings, but I'm feeling good about it. I can guarantee that if I won't be pulling it apart to chase a problem like I did with the Ford 4 times over. I'm trying the Top Gear Challenge method here: Maybe the PRV-6 will see that there's a redblock just waiting to take it's place if it fails, so it won't.


Top
 Profile  
 
 Post subject: Re: Project Bertone
PostPosted: Tue Jan 25, 2011 2:33 pm 
Haha, I just built a W24 Octo-Turbo, now what?!
User avatar

Joined: Wed Jun 14, 2006 4:19 pm
Posts: 3131
Location: Lethbridge, AB
This is the best build thread ever :lol: :lol: ...I'm howling in my office because it's just so funny. I mean it will go like hell and be just fine, but your candour is so refreshing =D> . The end float passed visual inspection and plastigaging only tells you to fix stuff. Damn - that's piss myself funny.

My hat's off to you Matt - you're sticking to your guns. I've got a lot of respect for that, I could never do it. I'd dick around with it and measure the hell out of it and replace everything for no reason. I will never learn - but you're right, it won't make a hill of beans of difference unless you're going to do something about it. Sort of like mirror polishing an exhaust port - fun but pointless.

Carry on good sir.

_________________
Coburn Performance - OCD comes naturally.


Top
 Profile  
 
 Post subject: Re: Project Bertone
PostPosted: Tue Jan 25, 2011 4:34 pm 
Haha, I just built a W24 Octo-Turbo, now what?!
User avatar

Joined: Wed Dec 21, 2005 8:40 pm
Posts: 3492
Location: Calgary, Ab
Did I mention that the rod bearings that went into this engine... came from a different engine? I've never done something so ghetto.


Top
 Profile  
 
 Post subject: Re: Project Bertone
PostPosted: Tue Jan 25, 2011 7:01 pm 
Haha, I just built a W24 Octo-Turbo, now what?!
User avatar

Joined: Wed Dec 21, 2005 4:32 pm
Posts: 1927
Location: Didn't learn, now renovating bathroom #2, and you think cars are expensive!!!
This is an awesome thread Matt, I am enjoying every update

_________________
Volvord Image
1989 744TI Ford 302, Wilwood Brakes, 5 speed


Top
 Profile  
 
 Post subject: Re: Project Bertone
PostPosted: Sun Jan 30, 2011 8:47 pm 
Haha, I just built a W24 Octo-Turbo, now what?!
User avatar

Joined: Wed Dec 21, 2005 8:40 pm
Posts: 3492
Location: Calgary, Ab
Bleh, what a weekend. Basically found a pile of parts incompatibility.

Volvo block, Volvo timing cover, Eagle heads. Small oil leak.
Image

From another angle. The European version of this engine (in French applications) uses balancers on the passenger cam to make the engine even more ridiculously smooth. Volvo and Eagle don't use this, but Volvo kept the bulge for the balancers in the B280. Eagle did not. Good thing the B27/B28/B280 gasket kit comes with the B27/B28 balancer-free timing cover gaskets.
Image

Good thing I have an Eagle timing cover!
Image

Pretty wrinkle-finish painted cam cover:
Image

Awwww... Good thing the B27/B28/B280 gasket kit comes with B27/B28 balancer-free cam cover gaskets.
Image

Then when the timing cover gets bolted down, something breaks! Good thing I don't need it in this application! I don't think it'll leak - I cut away all the "extra" gasket and it is backed all 'round by metal.
Image

The offender: a chunk of the timing cover that was relieved in the Volvo app, but not in the Eagle app. Never noticed this until it was too late.
Image

Notice a difference? Eagle timing cover:
Image

Volvo timing cover (notice the lack of ribbing around the front crank seal):
Image

Damage done to Volvo crank pulley when installed on Eagle front cover (going to have to grind away at the ribbing. Eagle uses a serpentine belt system and Volvo uses V-belts, apparently the V-belts take up more room):
Image

Additionally, the timing chain & sprocket set is for anything but a B280, which has a front-mount distributor. This distributor is driven off the front of the cam, the sprocket of which has a pin to drive the extension. The new sprockets I have do not, so I had to use the old ones. Also, for some reason the new timing chains are too tight to do up, so I had to use the old ones. Furthermore, the B27/B28/B280 gasket kit does not come with a seal for the front distributor, so I have to order a new one.

Basically got my ass kicked this weekend... but I'm learning lots and hopefully the 2 or 3 people who google their way here can learn from my experience.


Top
 Profile  
 
 Post subject: Re: Project Bertone
PostPosted: Mon Jan 31, 2011 10:13 am 
Haha, I just built a W24 Octo-Turbo, now what?!
User avatar

Joined: Wed Dec 21, 2005 8:40 pm
Posts: 3492
Location: Calgary, Ab
Flippin' yippee. Distributor seal, $27 at Volvo. Nothing generic available. I even dug through my shop garbage to find the old one, and for some reason I can't.

I did have a look at the gasket versus the area that broke away, and there's still a good 2mm of gasket surface left on the chain cover. Better be good enough.


Top
 Profile  
 
 Post subject: Re: Project Bertone
PostPosted: Mon Jan 31, 2011 3:54 pm 
Haha, I just built a W24 Octo-Turbo, now what?!
User avatar

Joined: Wed Jun 14, 2006 4:19 pm
Posts: 3131
Location: Lethbridge, AB
Ugly Duck wrote:
Flippin' yippee. Distributor seal, $27 at Volvo. Nothing generic available. I even dug through my shop garbage to find the old one, and for some reason I can't.

I did have a look at the gasket versus the area that broke away, and there's still a good 2mm of gasket surface left on the chain cover. Better be good enough.


Weld it up...get some cast TIG AL rod and get at it.

_________________
Coburn Performance - OCD comes naturally.


Top
 Profile  
 
 Post subject: Re: Project Bertone
PostPosted: Mon Jan 31, 2011 4:57 pm 
Haha, I just built a W24 Octo-Turbo, now what?!
User avatar

Joined: Wed Dec 21, 2005 8:40 pm
Posts: 3492
Location: Calgary, Ab
Let me think about that for a minute. Annnd, I'm gonna have to go with NOPE!


Top
 Profile  
 
 Post subject: Re: Project Bertone
PostPosted: Mon Jan 31, 2011 10:27 pm 
Haha, I just built a W24 Octo-Turbo, now what?!
User avatar

Joined: Wed Jun 14, 2006 4:19 pm
Posts: 3131
Location: Lethbridge, AB
Ugly Duck wrote:
Let me think about that for a minute. Annnd, I'm gonna have to go with NOPE!

Chicken.

_________________
Coburn Performance - OCD comes naturally.


Top
 Profile  
 
 Post subject: Re: Project Bertone
PostPosted: Tue Feb 01, 2011 6:58 am 
Haha, I just built a W24 Octo-Turbo, now what?!
User avatar

Joined: Wed Dec 21, 2005 8:40 pm
Posts: 3492
Location: Calgary, Ab
122_Canuck wrote:
Ugly Duck wrote:
Let me think about that for a minute. Annnd, I'm gonna have to go with NOPE!

Chicken.

I'd sooner go grab another piece from PNP, IF this one leaks. Which it won't. Ruining the gaskets and cleaning up the goop from the block just to butcher it for welding practice ain't my idea of a happy time.


Top
 Profile  
 
Display posts from previous:  Sort by  
Post a new topicPost a reply Page 12 of 22   [ 322 posts ]
Go to page Previous  1 ... 9, 10, 11, 12, 13, 14, 15 ... 22  Next


Who is online

Users browsing this forum: No registered users and 2 guests


You cannot post new topics in this forum
You cannot reply to topics in this forum
You cannot edit your posts in this forum
You cannot delete your posts in this forum
You cannot post attachments in this forum

Jump to:  
cron


Powered by phpBB © 2000, 2002, 2005, 2007 phpBB Group
610nm Style by Daniel St. Jules of Gamexe.net