Next up, big freaking driving lights.
This is my first foray into the world of wiring up lights properly. Never done it. So, I got some big freaking lights off Dale with 100 w. bulbs. Excellent. I decided top of the bumper was the place to be, out of the muck (also see previous inspirational photos). I did some measuring and comparing to ensure they were out of the way of my headlamps (soon to be 55/100 w. H4s). Once that was done, I cut a sliver out of the rubber trim around the bumper, with the goal of moving the lights slightly back, and to provide a hole for the wiring to run through.

After drilling the holes, I mounted the lights on top of some rubber washers I found in the plumbing section at Crappy Tire, so as to provide some vibration damping. I put in some extra o-rings for support.
The end result is the lights are slightly back of the bumper edge, just out of the way of trouble.

Onto the wiring. I had an original Volvo fog lamp switch also from Dale. That was wired to fuse #10, with the second switch wiring going through a hole left by our friends at Sears when they put in cruise control on this car some time ago.

I got a couple grommets to fill the hole, but left more room for the remaining wiring for my next headlight wiring job.
I decided to use the vacant spot on the junction block panel, nice and close to the battery, to house my Bosch relay.

Everything was shrink wrapped, and the area around the junction was cleaned and waxed while it was out. The fused connection was wired straight to the junction block, as there were a few vacant spots, and I hate crappy wiring coming off the battery. The relay ground is next to the panel as well.

After that, I wanted the wiring to be as clean and look as stock as possible. I ended up running it along the hood release cable line.

And then through the grommet below the rad tray. All the wiring here is 12 gauge.

The wiring on the lights was done with the supplied connectors using 12 gauge wire, then ran out the bottom, shrink wrapped, and sent through the holes I had cut in the rubber trim.

From there, the grounds were split off to ring connectors on the frame, while the power wires merged and ran through another grommet on the rad support.

I made the connection to power there, made my first (really ugly) soders (its harder than I thought), shrink wrapped it all, and then tucked it in behind the rad support.

I wanted everything to be out of the weather and clean.
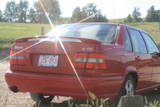
How it all finally looks:

And TADA!

My excitement was tangible.
First flip of the switch, everything worked! The relay trips nicely, and the lights seem pretty bright. I have them pointed slightly in and down for now, as I have NO IDEA how to aim lights. I'll wait until I'm in the country sometime to set them up properly. But for now, I'm stoked.