Change font size
It is currently Fri Dec 27, 2024 8:45 am


Post a new topicPost a reply Page 7 of 28   [ 407 posts ]
Go to page Previous  1 ... 4, 5, 6, 7, 8, 9, 10 ... 28  Next
Author Message
 Post subject: Re: 242 Build Thread.
PostPosted: Wed Nov 04, 2009 6:57 pm 
Haha, I just built a W24 Octo-Turbo, now what?!
User avatar

Joined: Wed Jun 14, 2006 4:19 pm
Posts: 3131
Location: Lethbridge, AB
paperjam wrote:
Its the rule of three.

one primary, one secondary, and one accent. You dont want your colors competing for attention too much. If you will notice on the mustang that the Grey secondary color is very similar in shade and tone to the blue of the rest of the car. try to keep your color similar (at least in tone) to ensure it wont look gaudy. its ok for pinstripes to be loud, as they are so small.


I'm with you there Alex...the third colour is the black stripe/trim.

_________________
Coburn Performance - OCD comes naturally.


Top
 Profile  
 
 Post subject: Re: 242 Build Thread.
PostPosted: Wed Nov 04, 2009 7:26 pm 
Haha, I just built a W24 Octo-Turbo, now what?!
User avatar

Joined: Wed Jun 14, 2006 4:19 pm
Posts: 3131
Location: Lethbridge, AB
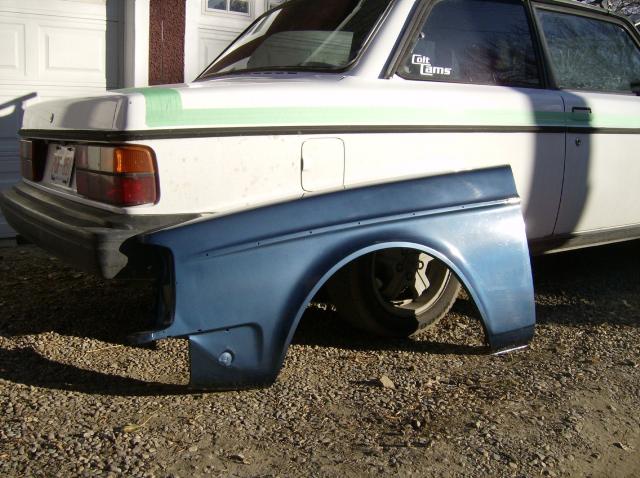
OK - on with the bodywork...I'm very happy to announce that the white car is going to be derusted and straightened starting now. GO. For those that have never seen the car, the clear had peeled and some idiot had painted over it giving it less prep than I would my fence. It is horrific.

So the first order of business was to lift some panels from Matt's collection. He was more than happy to donate to the cause as there seemed to be a garden of panels to select from - all different colours sprouting up around his yard. I chose the green one and two red ones.

I thought the green one was going to be a winner as it was very shiny and looked like it had been well cared for - only one small dent was visible. Magic, I thought.

So I get the parts home and let them season for about a year (no sense rushing into things). The other day while waiting for my furnace to be installed, I decided to derust the panels and weld up the trim holes.

It goes something like this.

First, you can't weld over paint, rust, goo from the factory, or any other crap - so I cleaned the green fender and a red fender (the other red fender was painted blue for a test).

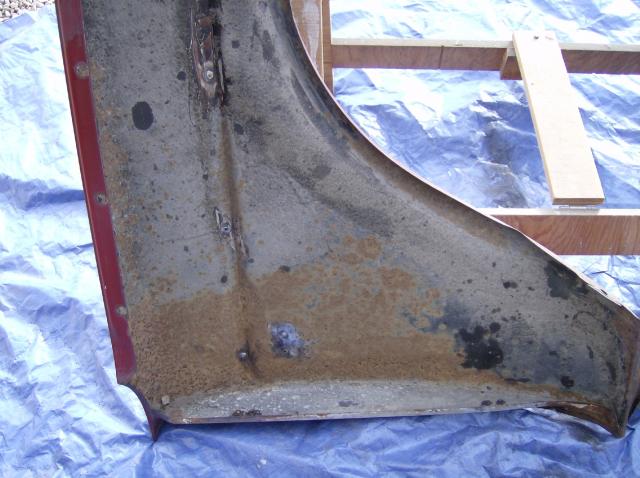
Clean the backsides with a heat gun to get the undercoating off and then wash with thinner or hit it with a surfacing disk. This is just before washing and prepping with the surfacing disk. A heat gun does work on this stuff - skinks though.

Image

Then using a heat sink (copper pipe flattened in vice) weld up the holes from the BACK side using the sink against the front side of the panel. Keep the heat down (using 0.023 wire lowest heat) and make nice little welds. Take your time as you don't want to warp the heck out of the panel.

Done.
Image

Front side - oops forgot to clean all the paint off the front.
Image

This is much less work to fill in the end compared to welding on the front side. The heat sink makes the spot almost level as the heat is directed away from the sheet metal into the sink (making it hard to hold :lol: ).

Now - inspect the panel - look for dents (some are obvious like this one, some need to be found).

Image

These have to be taken out with hammer and dolly work - no filler until you can't get it straighter. This dent is around 5 mm deep and was enough to stretch the panel (when I beat it out - the panel was flexible like an oil can). This then required shrinking (don't fill oil-canned sheet metal, it will just pop off). The technique involves either a shrinking disk or a torch. I opted for the torch this time as it was handy. Just heat the spot a little at a time (not red hot) and quench it with water. This shrinks the metal back to it's original shape. It takes some practice, but don't stop until you get the panel to the point that it is fully tensioned again. Took about 20 minutes - no pictures I was holding a torch for heaven's sake!

Look for other nasties - rusted bolts (there were 2). They look impossible to remove - but grind them clean on the back side and then weld on a bolt. Like so.
Image

The heat helps - then just wind it out when hot.
Image

Chase the holes with a tap (oil them up in advance) - this cleans out the rust.

Last but not least - take the fender out to be blasted clean of surface rust. The green fender didn't survive. A little surface rust ended up being not worth repairing as I was able to blast right through. Then I was stuck with the panel that I had painted 2 coats of paint on as a test.

Wash off fresh paint with lacquer thinner - weld holes first...go into house with solvent buzzzzzzzz :mrgreen:

Done - (note dents removed).

Before.
Image

After an hour with the thinner...
Image

_________________
Coburn Performance - OCD comes naturally.


Top
 Profile  
 
 Post subject: Re: 242 Build Thread.
PostPosted: Wed Nov 04, 2009 7:55 pm 
Haha, I just built a W24 Octo-Turbo, now what?!
User avatar

Joined: Wed Dec 21, 2005 8:40 pm
Posts: 3492
Location: Calgary, Ab
So THAT'S how you weld up trim holes! Brilliant! =D>


Top
 Profile  
 
 Post subject: Re: 242 Build Thread.
PostPosted: Wed Nov 04, 2009 11:15 pm 
Haha, I just built a W24 Octo-Turbo, now what?!
User avatar

Joined: Thu Dec 29, 2005 12:29 am
Posts: 1790
Location: Eating tofu and legumes in my hippie shack
I'm starting to get excited for this. Sweet!

_________________
Image


Top
 Profile  
 
 Post subject: Re: 242 Build Thread.
PostPosted: Wed Nov 04, 2009 11:52 pm 
Whost Pore
User avatar

Joined: Tue May 06, 2008 6:54 pm
Posts: 579
Location: Brentwood
Ugly Duck wrote:
So THAT'S how you weld up trim holes! Brilliant! =D>


glad I saw this BEFORE I attempt to weld up mine...

_________________
__________________________________________
Alex

87 245, +t 517k
83 242t Project


Top
 Profile  
 
 Post subject: Re: 242 Build Thread.
PostPosted: Thu Nov 05, 2009 6:02 pm 
Haha, I just built a W24 Octo-Turbo, now what?!
User avatar

Joined: Wed Jun 14, 2006 4:19 pm
Posts: 3131
Location: Lethbridge, AB
Another day waiting around for the inspector to come and pass the heating and electrical. He was a no show again! Anyway, it was very warm in Southern Alberta today so I decided to sandblast the fenders and get them in some epoxy primer. I've never used the pressure blaster so this was a learning experience. I started by putting down a single tarp (I'm an optimist :roll: ) and lining every thing up that I needed.
Image

I bought some copper slag blasting media - this turned out to be a mistake. Anyway, I fiddled around with the various ball valves and managed to turn this...

Image

Image

into...

First try - changed to a less coarse blast media (works better).
Image

Done.
Image

I then treated the panels to some Metal Ready (they rust very quickly) - and got ready to shoot. I didn't bother feathering things out - I've got filling and some more masaging to do still. This is just a "get it covered" coat for the front and I'm going to shoot the back sides with whatever I've got after I seam seal it - then undercoat.

Here we are almost ready to shoot - still have to clear some stuff out of the way and put up the final drape.
Image

Here they are done.
Image

Image

Image

Now to get some paint on them tomorrow and get them undercoated.

_________________
Coburn Performance - OCD comes naturally.


Top
 Profile  
 
 Post subject: Re: 242 Build Thread.
PostPosted: Thu Nov 05, 2009 11:08 pm 
Haha, I just built a W24 Octo-Turbo, now what?!
User avatar

Joined: Thu Dec 29, 2005 12:29 am
Posts: 1790
Location: Eating tofu and legumes in my hippie shack
Very nice.

_________________
Image


Top
 Profile  
 
 Post subject: Re: 242 Build Thread.
PostPosted: Sat Nov 07, 2009 6:43 pm 
Haha, I just built a W24 Octo-Turbo, now what?!
User avatar

Joined: Wed Jun 14, 2006 4:19 pm
Posts: 3131
Location: Lethbridge, AB
Today Greg swung by and we got going on stripping the car (well Greg did most of the heavy lifting). The car is actually remarkably solid underneath and the rust is limited to the usual places with the exception of the rust around the windshield which is pretty bad. We met in the AM and developed a game plan and pulled all the trim off the car. I then took it to the car wash for a good going over and a wash with Comet to clean off the wax and other contaminants.

Greg then got to work doing what he does best and I started hacking out the rust.
Image

The rear butt cheek areas are not bad and the inner parts are solid.
Image

I got to work on the replacement panels...hmmm, these need some shrinking.
Image

Ah, that's better.
Image

End of the day - no more front end.
Image

No more rear end.
Image

There are still some parts to strip off the car and put away, then I've got to get the rear end welded up, a little sandblasting and we decided that changing out the suspension at this point is probably easiest. So we'll have to swing by Greg's garage and pull the struts out of his car to put in mine and get the strut tubes blasted and fixed up before the fenders go back on.

No time lines yet, but we'll just keep on plugging.

_________________
Coburn Performance - OCD comes naturally.


Top
 Profile  
 
 Post subject: Re: 242 Build Thread.
PostPosted: Sat Nov 07, 2009 7:05 pm 
Whost Pore

Joined: Sun Feb 11, 2007 7:26 pm
Posts: 558
Location: E-Town
i'm curious, how do you shrink the edge of the panel like that that's just been crimped?


Top
 Profile  
 
 Post subject: Re: 242 Build Thread.
PostPosted: Sat Nov 07, 2009 7:46 pm 
Haha, I just built a W24 Octo-Turbo, now what?!
User avatar

Joined: Wed Jun 14, 2006 4:19 pm
Posts: 3131
Location: Lethbridge, AB
rockmonton wrote:
i'm curious, how do you shrink the edge of the panel like that that's just been crimped?


Shrinking metal requires a soft hammer backed up by either a metal dolly or a block of wood. It's pretty easy as they have already "gathered" the metal for you. I could have made that perfect, but I didn't go too far as it is a fender seam - here's a shot of the finished edge seen edge on.
Image

Remember, metal hammer and dolly stretch while a urethane hammer and wood will shrink (if gathered), if not then you have to either gather it yourself or use heat. I've seen lot of people bashing away on a panel with a hammer and dolly and they just stretch the heck out of things, sheet metal is only a few thou thick and doesn't require hammer blows that come form your shoulder or smashing over an anvil.

_________________
Coburn Performance - OCD comes naturally.


Top
 Profile  
 
 Post subject: Re: 242 Build Thread.
PostPosted: Sat Nov 07, 2009 9:34 pm 
Whost Pore

Joined: Sun Feb 11, 2007 7:26 pm
Posts: 558
Location: E-Town
so are you getting it hot at all to try and "push" the metal sorta to get thicker with the poly/wood?


Top
 Profile  
 
 Post subject: Re: 242 Build Thread.
PostPosted: Sat Nov 07, 2009 9:56 pm 
Haha, I just built a W24 Octo-Turbo, now what?!
User avatar

Joined: Wed Jun 14, 2006 4:19 pm
Posts: 3131
Location: Lethbridge, AB
rockmonton wrote:
so are you getting it hot at all to try and "push" the metal sorta to get thicker with the poly/wood?


No heat - cold forging.

_________________
Coburn Performance - OCD comes naturally.


Top
 Profile  
 
 Post subject: Re: 242 Build Thread.
PostPosted: Sat Nov 07, 2009 10:22 pm 
Whost Pore

Joined: Sun Feb 11, 2007 7:26 pm
Posts: 558
Location: E-Town
so then the metal actually gets "thicker" more or less? i think i'm gonna try that on the 220 rockers when i get around to it.


Top
 Profile  
 
 Post subject: Re: 242 Build Thread.
PostPosted: Sat Nov 07, 2009 10:47 pm 
Strapping on extra booster rockets
User avatar

Joined: Thu Mar 12, 2009 5:46 pm
Posts: 328
Location: Edmonton, AB
Interesting start - I'm looking forward to the updates! :)

What happens when it gets cold?

Brings back memories for me... :lol:
( http://s41.photobucket.com/albums/e279/ ... usDiaries/ )

_________________
Make: Volvo ¦ Model: 240 ¦ Year: 1991 ¦ Color: Met. Blue ¦ Engine: B230F Image


Top
 Profile  
 
 Post subject: Re: 242 Build Thread.
PostPosted: Sat Nov 07, 2009 11:32 pm 
0-60 in VERY FAST
User avatar

Joined: Mon Jul 27, 2009 10:58 pm
Posts: 158
Location: Coaldale, AB
is that the blue wagon that sits at the college?

_________________
1970 Mercedes 220D
1971 Daimler ds420
1977 Mercedes 230
1979 Mercedes 300TD
1993 Honda Del Sol Si
1994 Honda Civic dx hatch
2015 Mazda CX-5
2020 Hyundai Elantra manual
1982 240 DL coupe


Top
 Profile  
 
Display posts from previous:  Sort by  
Post a new topicPost a reply Page 7 of 28   [ 407 posts ]
Go to page Previous  1 ... 4, 5, 6, 7, 8, 9, 10 ... 28  Next


Who is online

Users browsing this forum: No registered users and 1 guest


You cannot post new topics in this forum
You cannot reply to topics in this forum
You cannot edit your posts in this forum
You cannot delete your posts in this forum
You cannot post attachments in this forum

Jump to:  
cron


Powered by phpBB © 2000, 2002, 2005, 2007 phpBB Group
610nm Style by Daniel St. Jules of Gamexe.net